This blog talks about Business Central State field customizations via...
Read MoreThis article talks about Business Central Purchase & Sales Reports that are available out of the box on cloud version. In this Article we list down some of the most asked Business Central Purchase & Sales Reports
And also included a link to the standard documentation for more details on the reports available. Please read more to find out
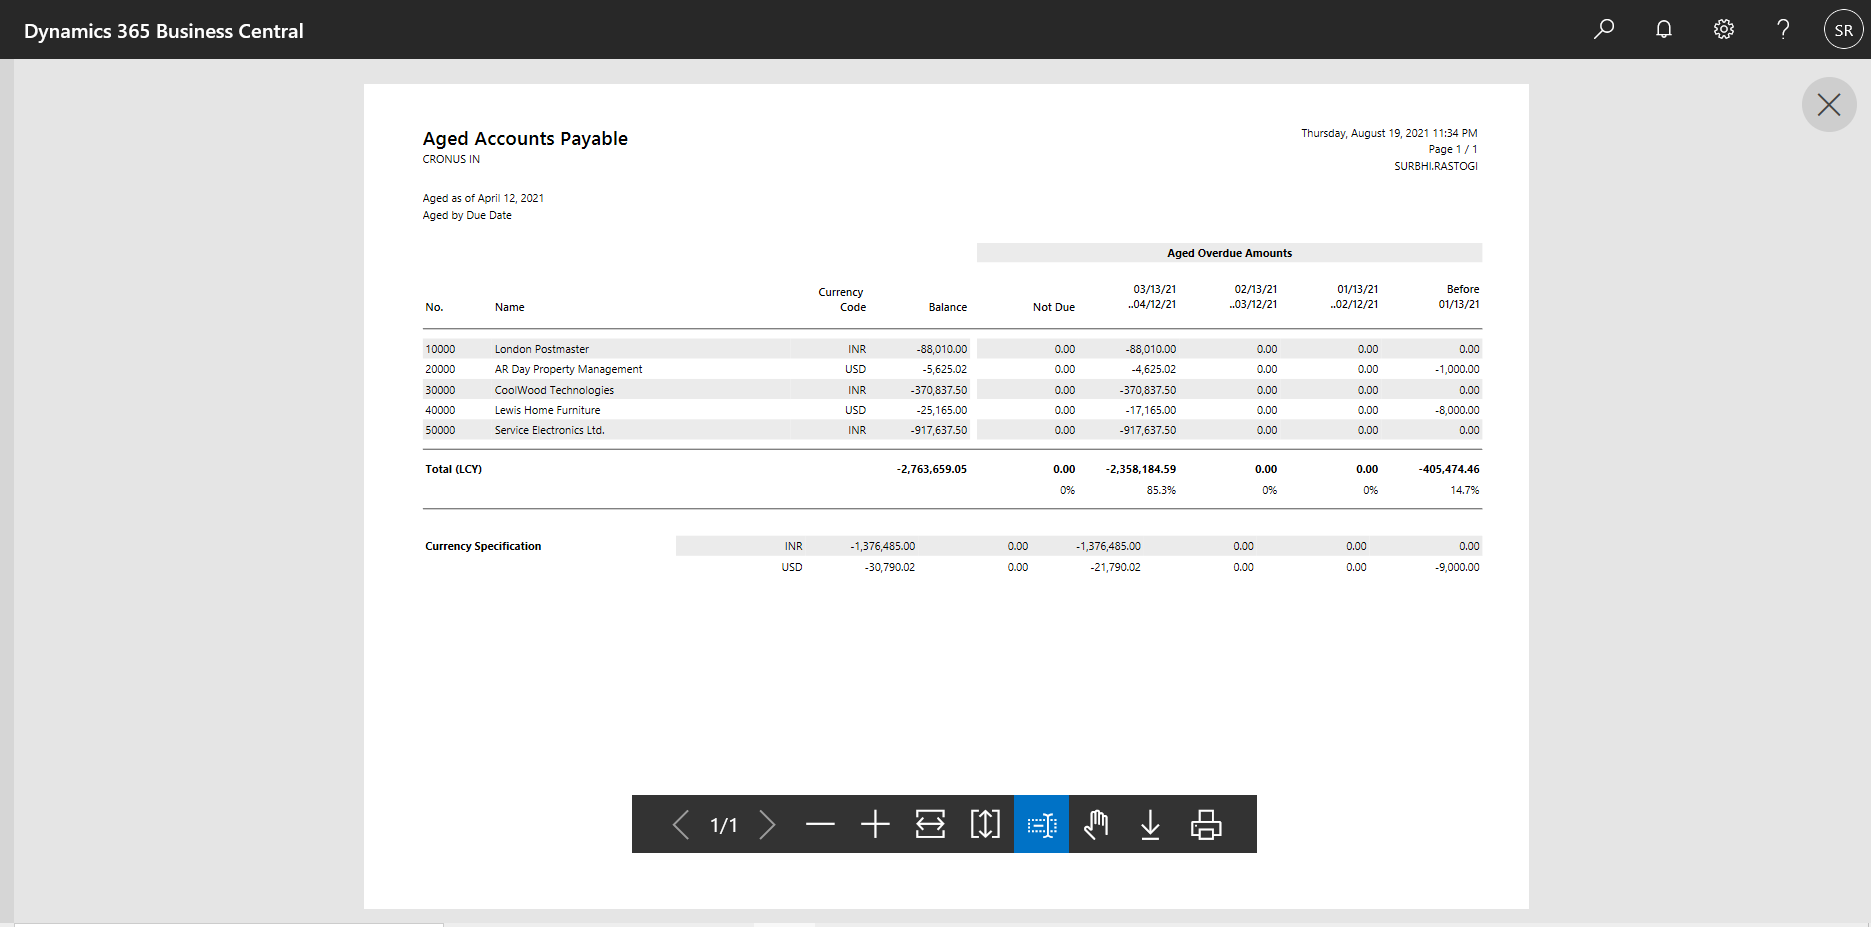
This report shows overdue balances for vendors in overdue time intervals. You can show the overdue amount by the due date,posting date or by document date as per need. You can choose to show the amounts in local currency (LCY) and print details of the overdue documents. The time intervals can have headings with dates or with number of dates overdue, relative to the specified aging by type.
This report is the main report for reconciling vendor ledger to G/L. Assuming that you have not allowed direct posting to the accounts used in the vendor posting groups’ payables account, this report is a specification of the amounts you find in the general ledger.
Click on the search icon and enter Aged Accounts Payable report, and then choose the related link.
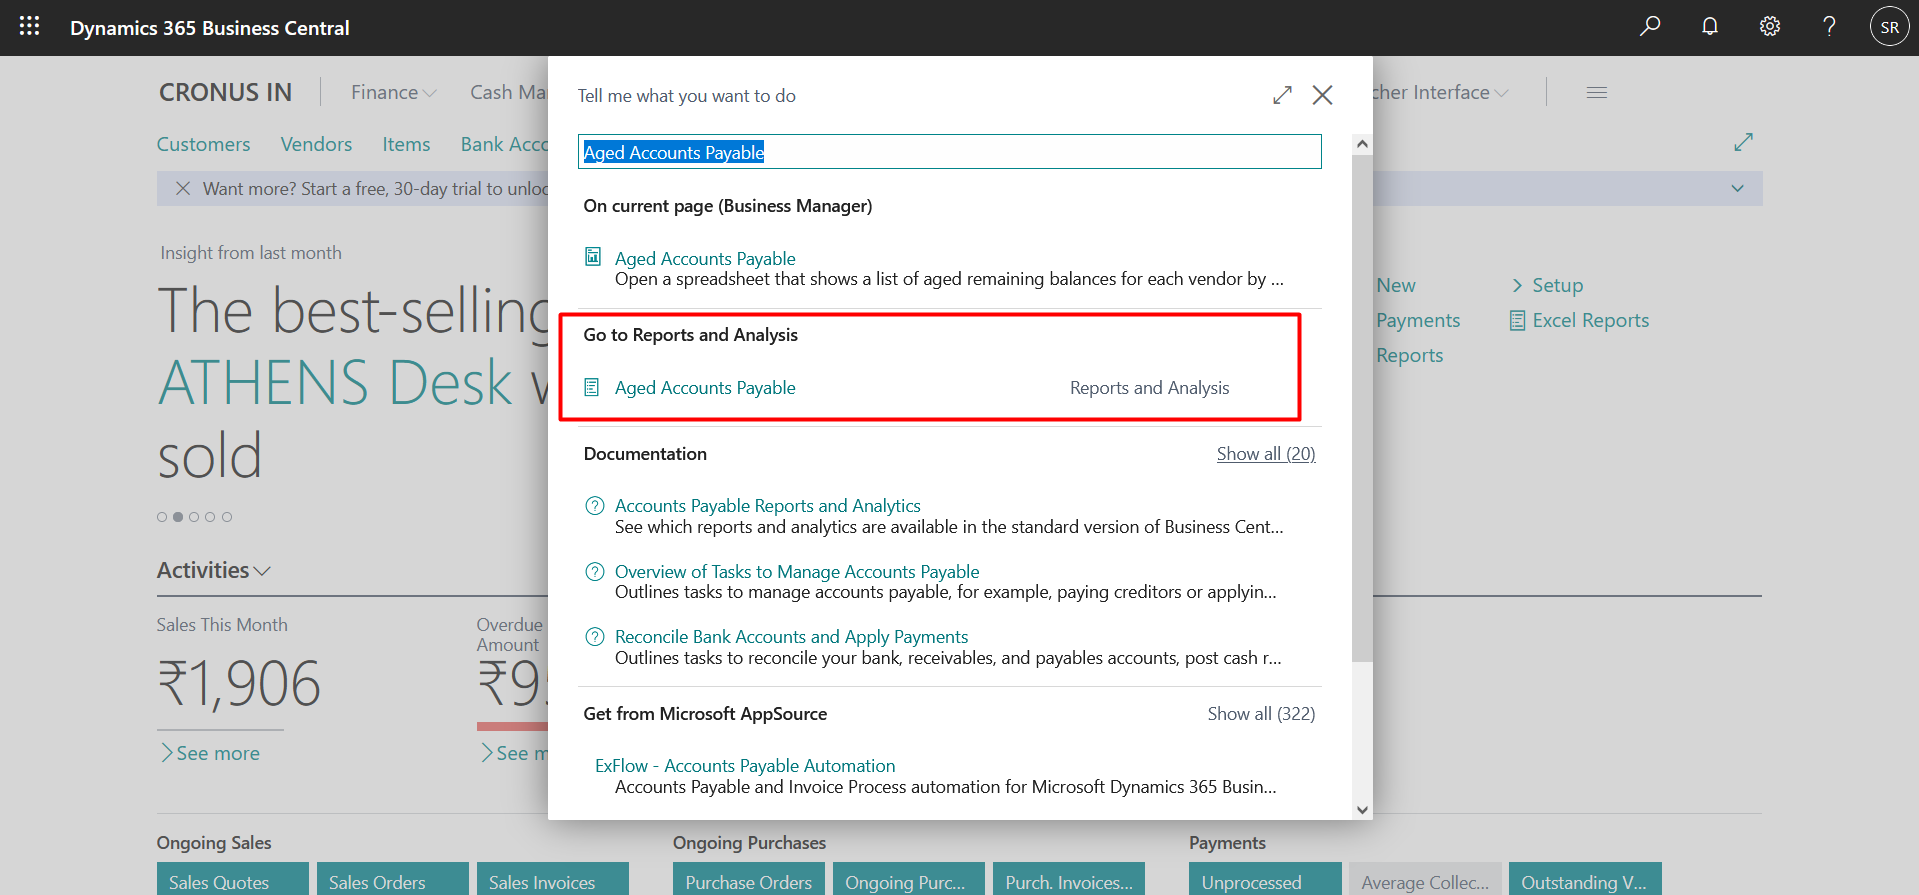
A new screen will be pop out like below
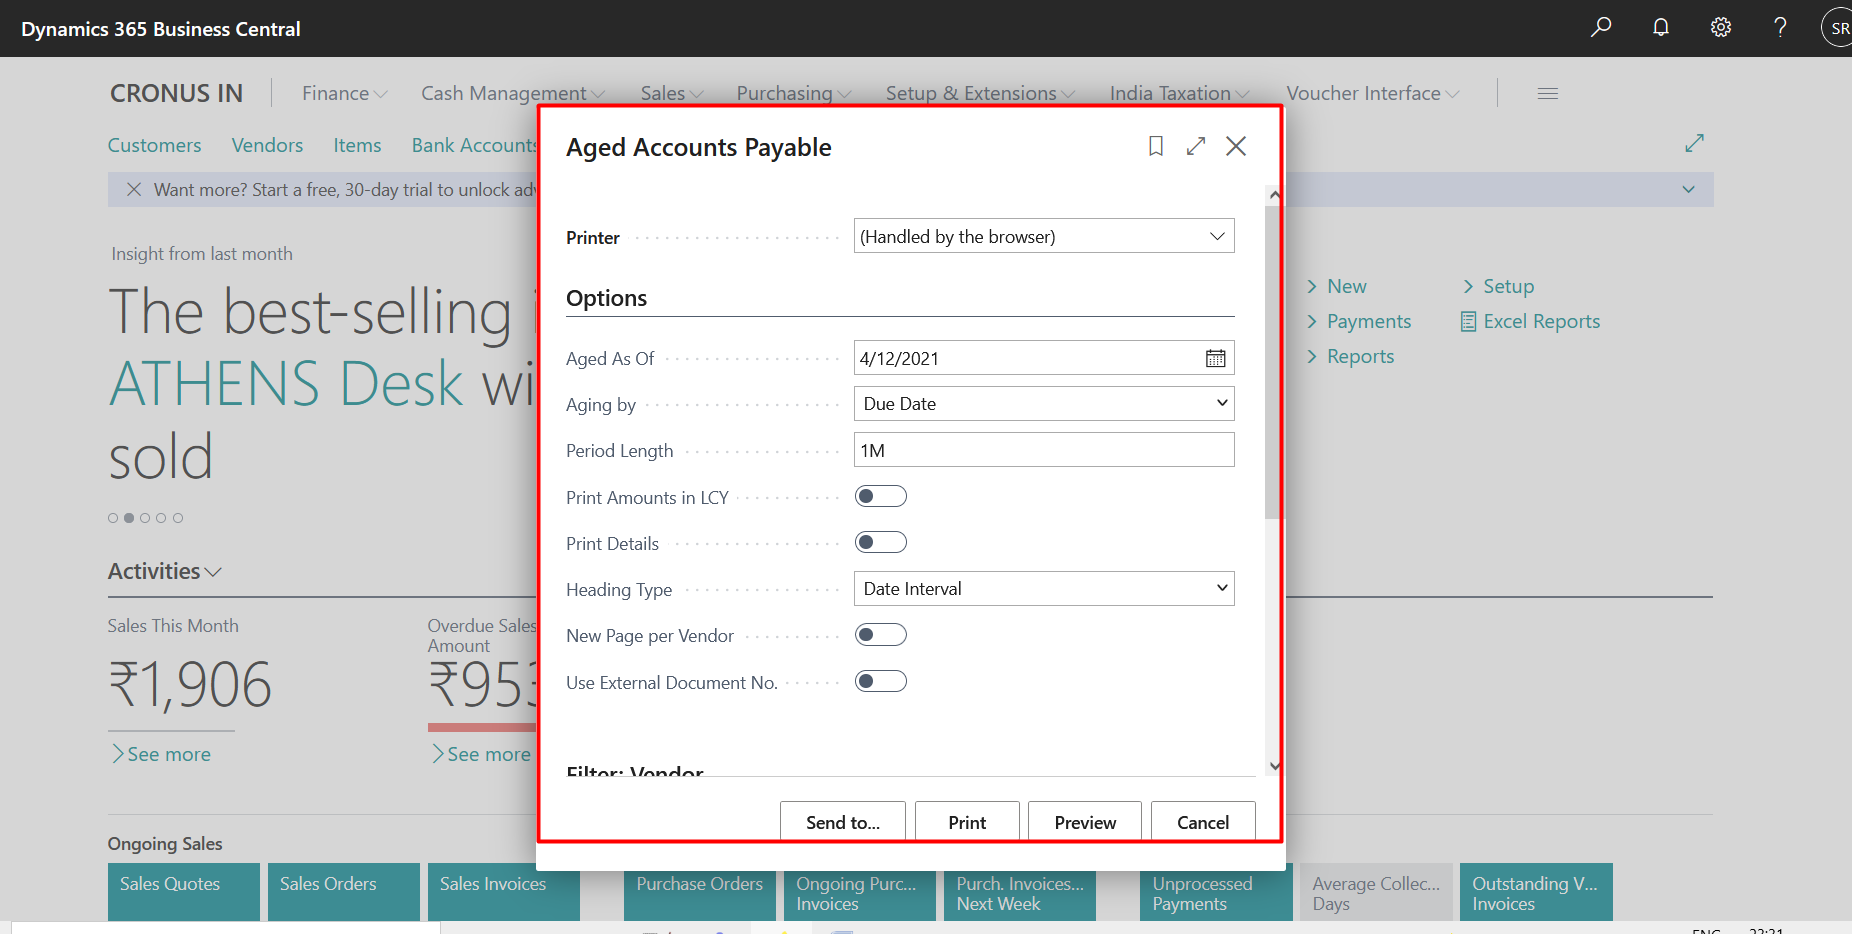
Select the options and click on Preview to see the report.
You can see the reports like below snippet.
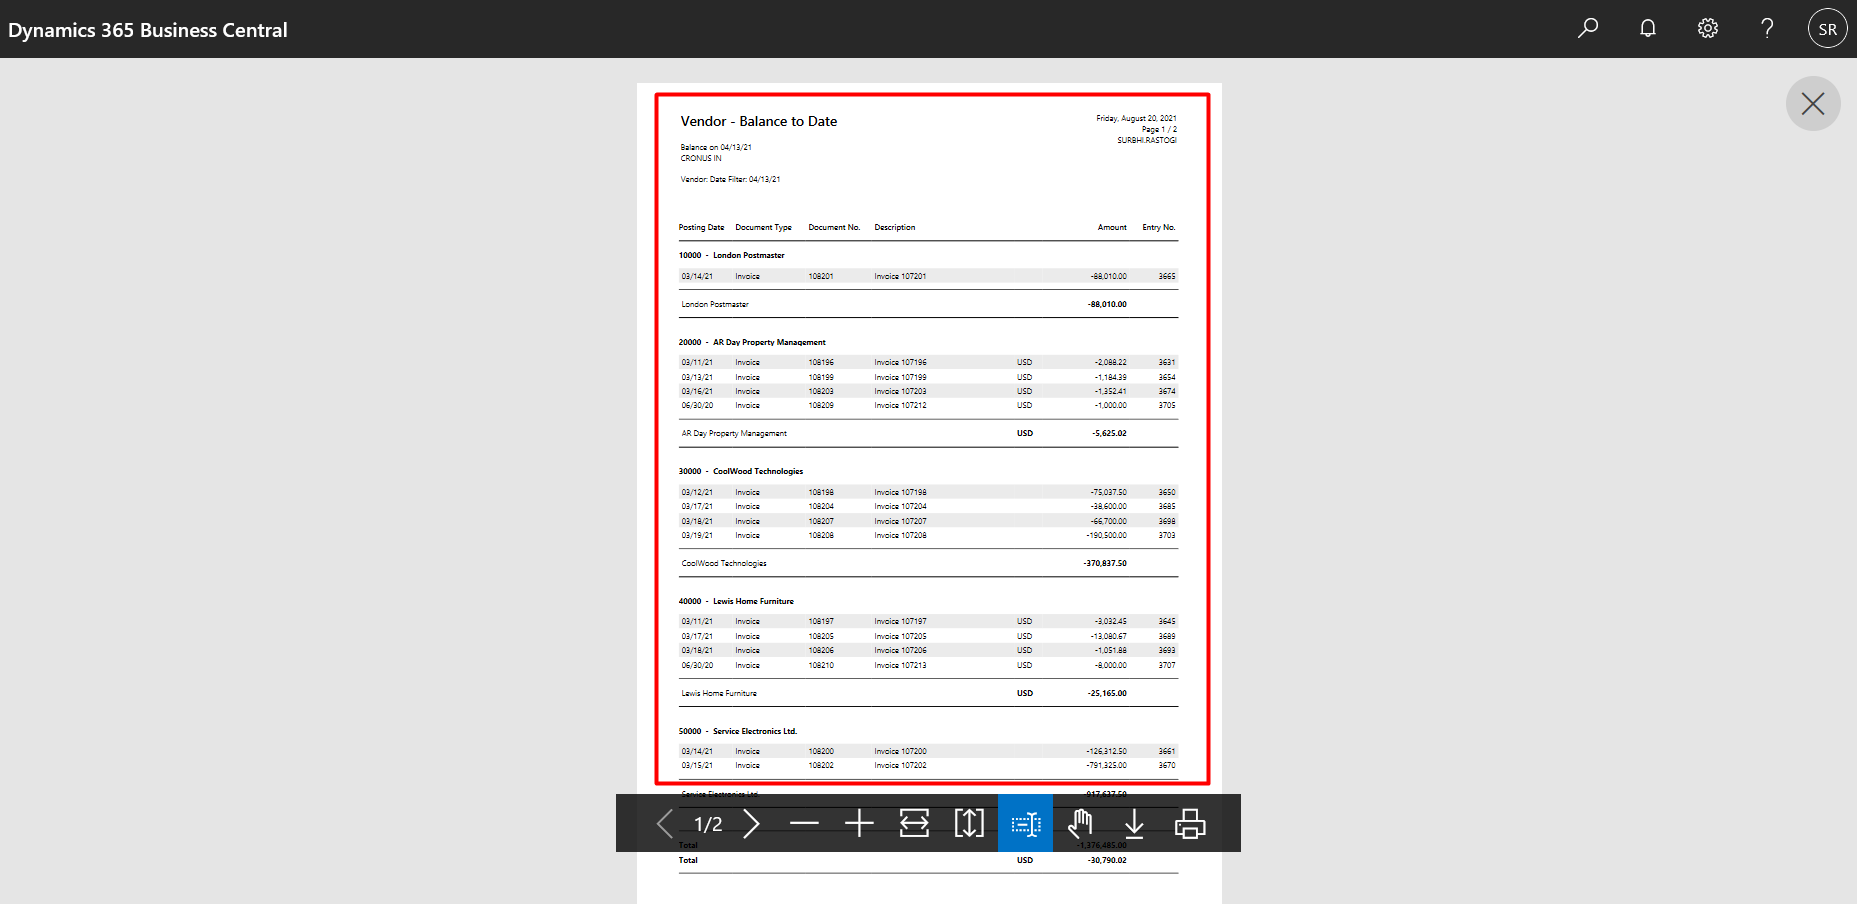
Shows the vendor balance by the ending date of the specified date range. You can choose to display the vendor balance in your local currency (LCY). Select the Include Unapplied Entries field to show entries that have been closed by the ending date but have been un-applied (opened) at a later date. Select the Show Entries with Zero Balance to show vendors with a balance of zero by the ending date of the date filter. The date filter applies to the detailed vendor ledger entries for the entries in the report. If you have payments later than the ending date that have been applied to invoices in within the date range, the invoices will appear in the report as they have not been closed as by the ending date.
Click on the search icon and enter Vendor – Balance to Date report, and then choose the related link.
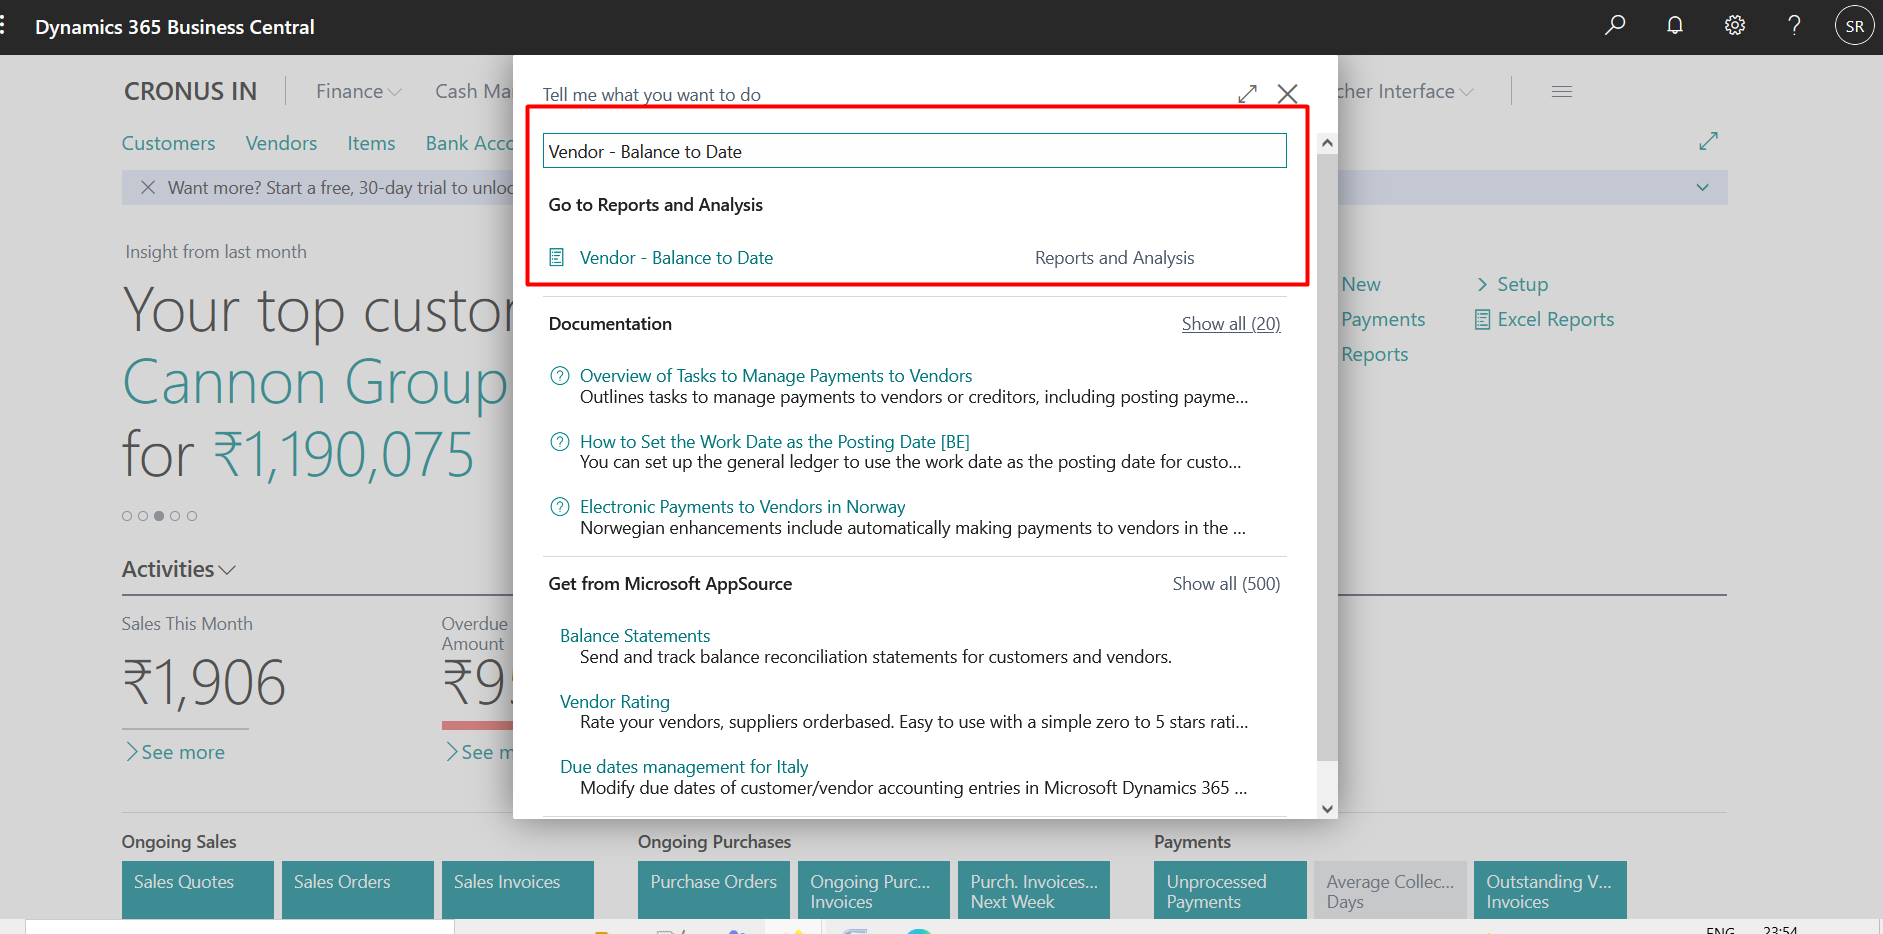
A new window will be pop out like below snippet.
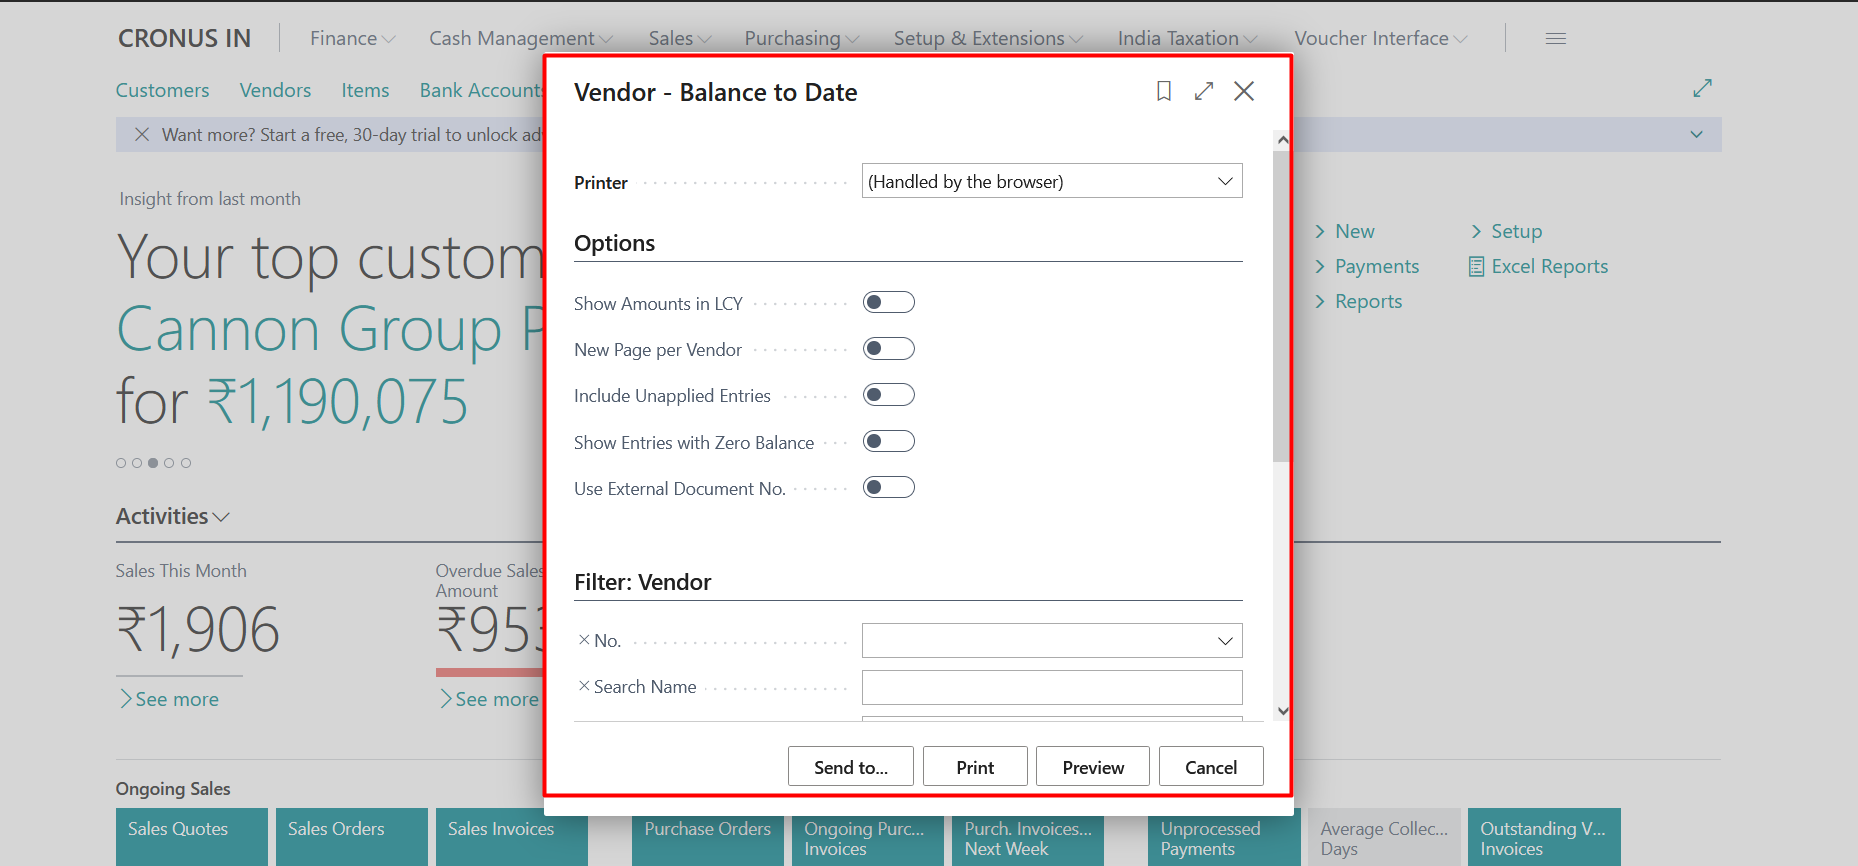
Select the required options and click on Preview to see the report preview.
Note: You need to provide a date filter else you will see below error.
Specify the date like below
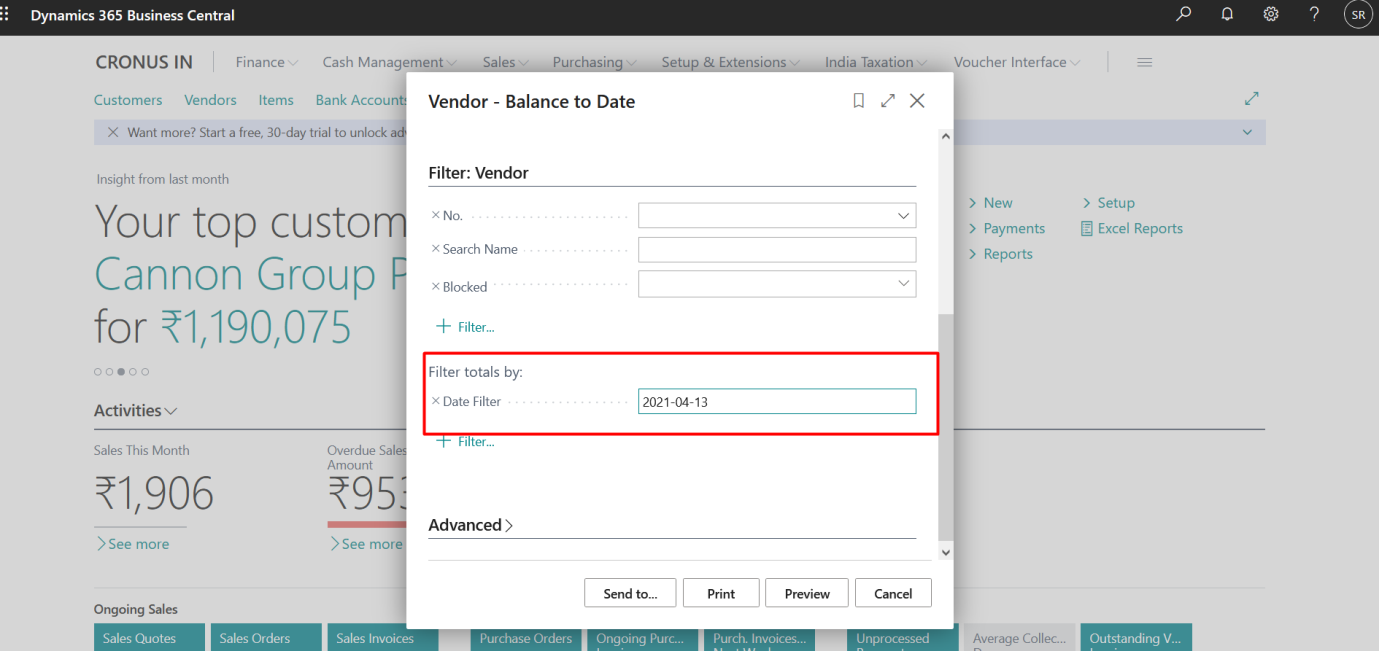
Click on Preview.
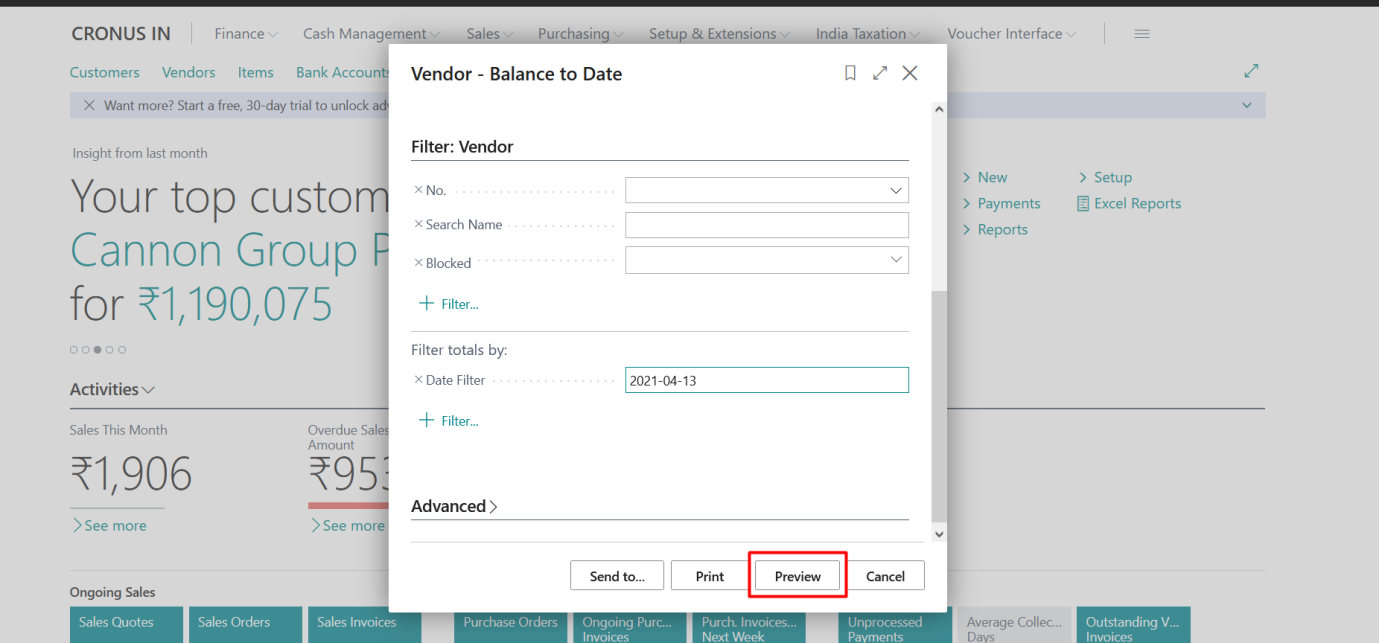
A report will be generated like below snippet.
Shows the net changes for vendors for the period specified in the date filter as well as the net change year-to-date for the fiscal year corresponding to the period selected. The report is grouped by vendor posting groups and will give a different view of the vendor ledger than the Aged Accounts Payable report. Note: If you haven’t set up any accounting period, the system will not know what fiscal year to use and will either show year-to-date from the most recent fiscal year defined or just select the period, which may or may not be from beginning of a year.
Click on the search icon and enter Vendor – Trial Balance (Vendor – Balance to Date) report, and then choose the related link.
A new window will be pop out like below snippet.
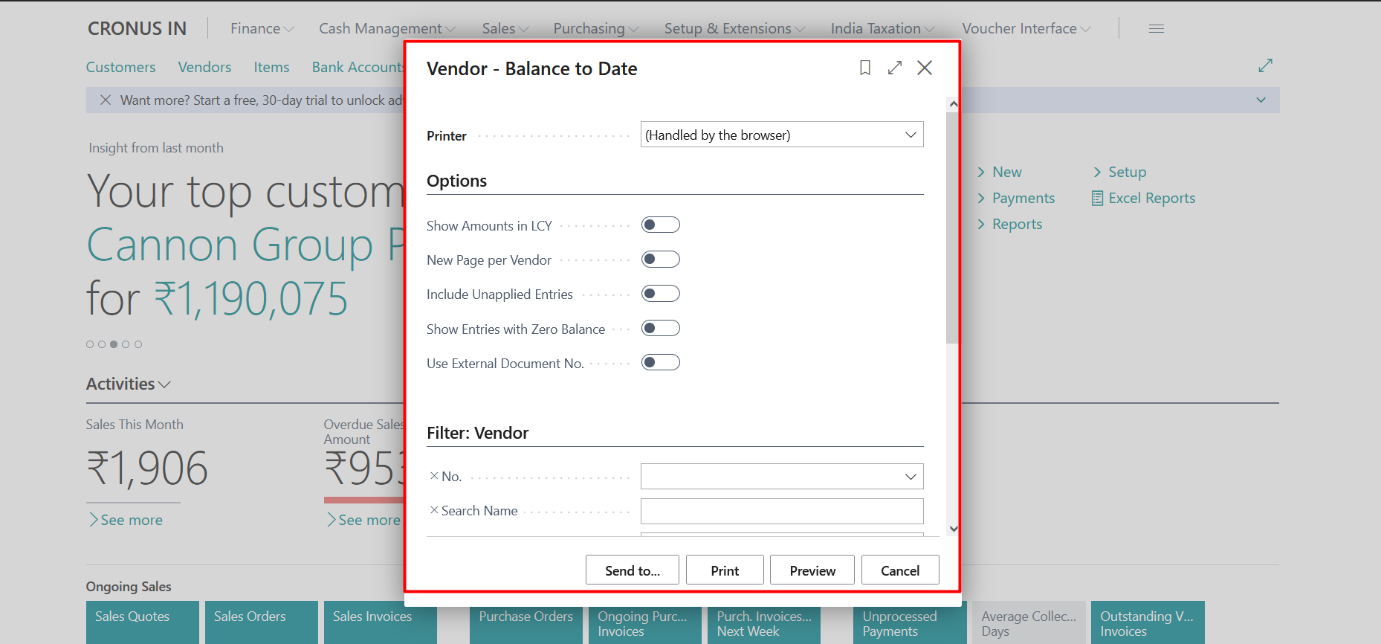
Select the required options and click on Preview to see the report preview.
Note: You need to provide a date filter else you will see below error.
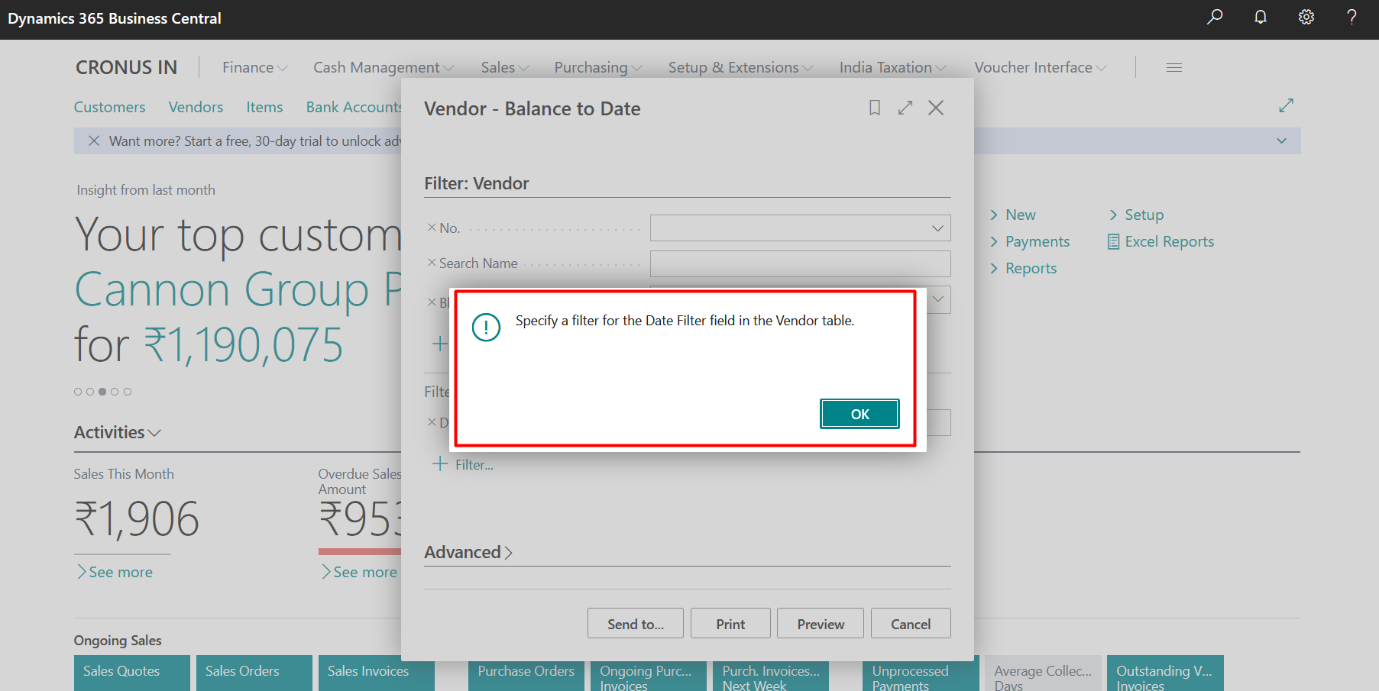
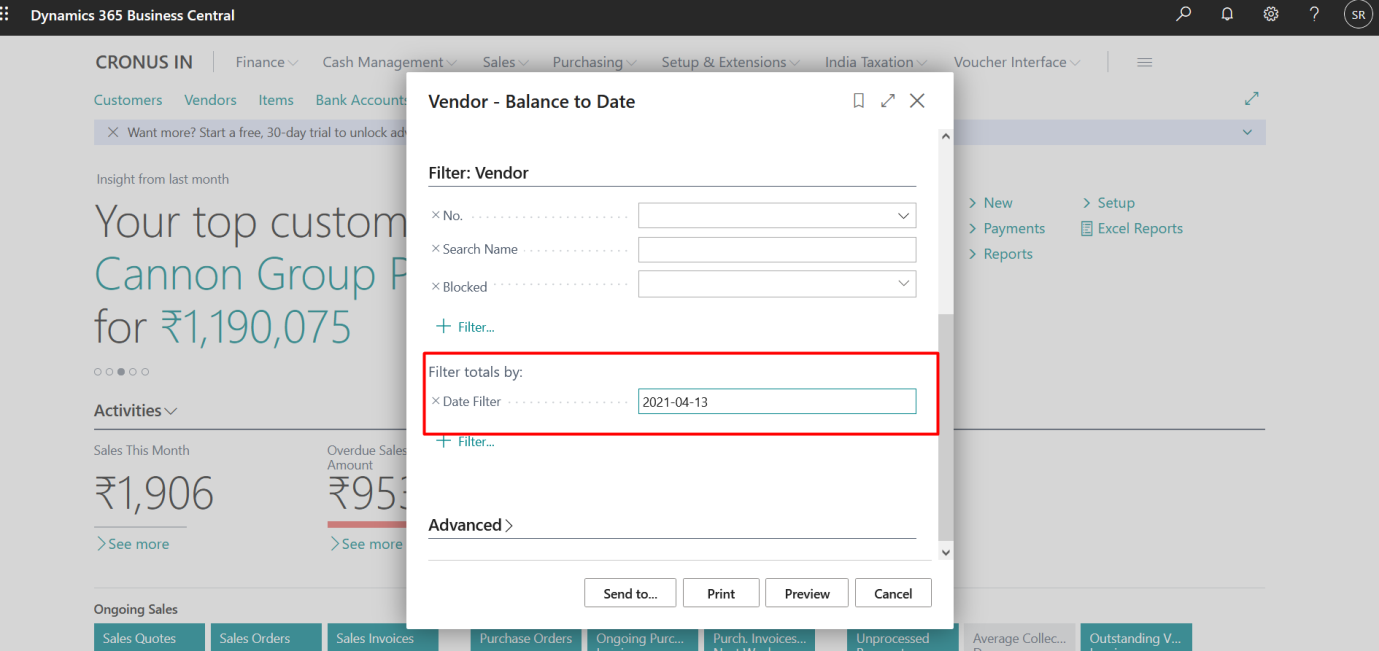
Specify the date like below
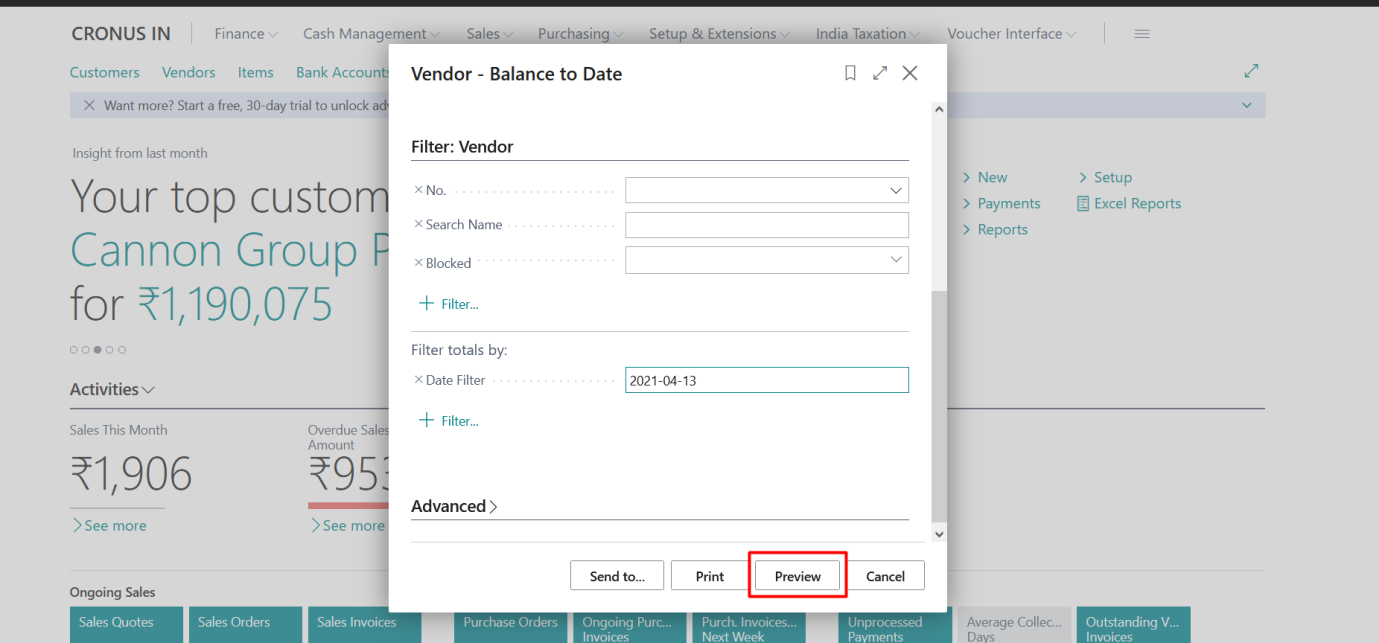
Click on Preview.
A report will be generated like below snippet.
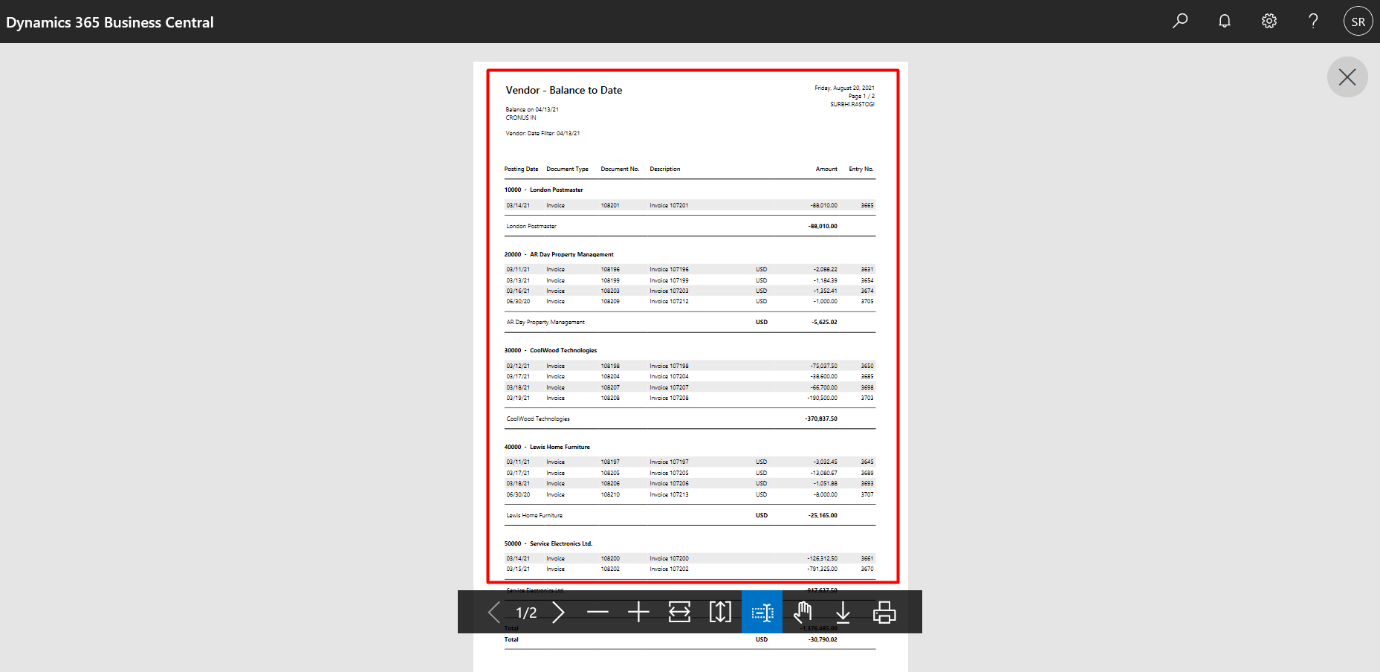
Shows all the vendor ledger entries within the specified date filter. The report shows the vendor’s beginning balances relative to the date filter.
Click on the search icon and enter Vendor – Detail Trial Balance report, and then choose the related link.
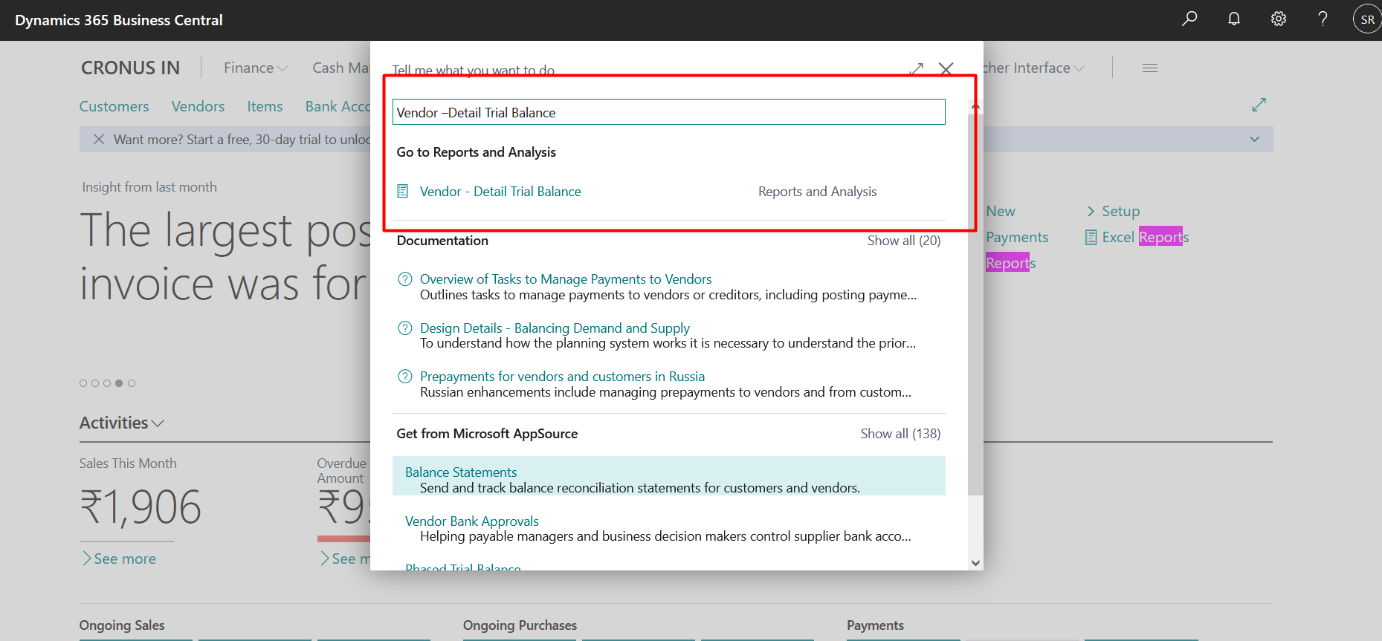
A new window will be pop out like below snippet.
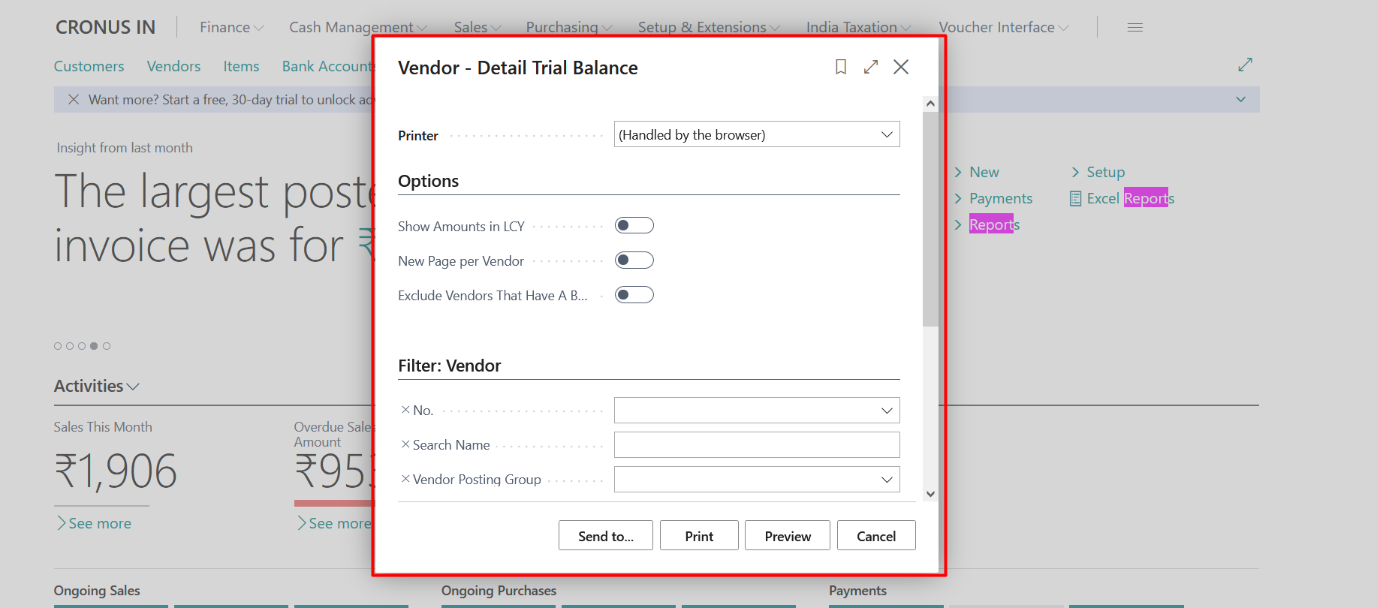
Select the required options and click on Preview to see the report preview.
Click on Preview.
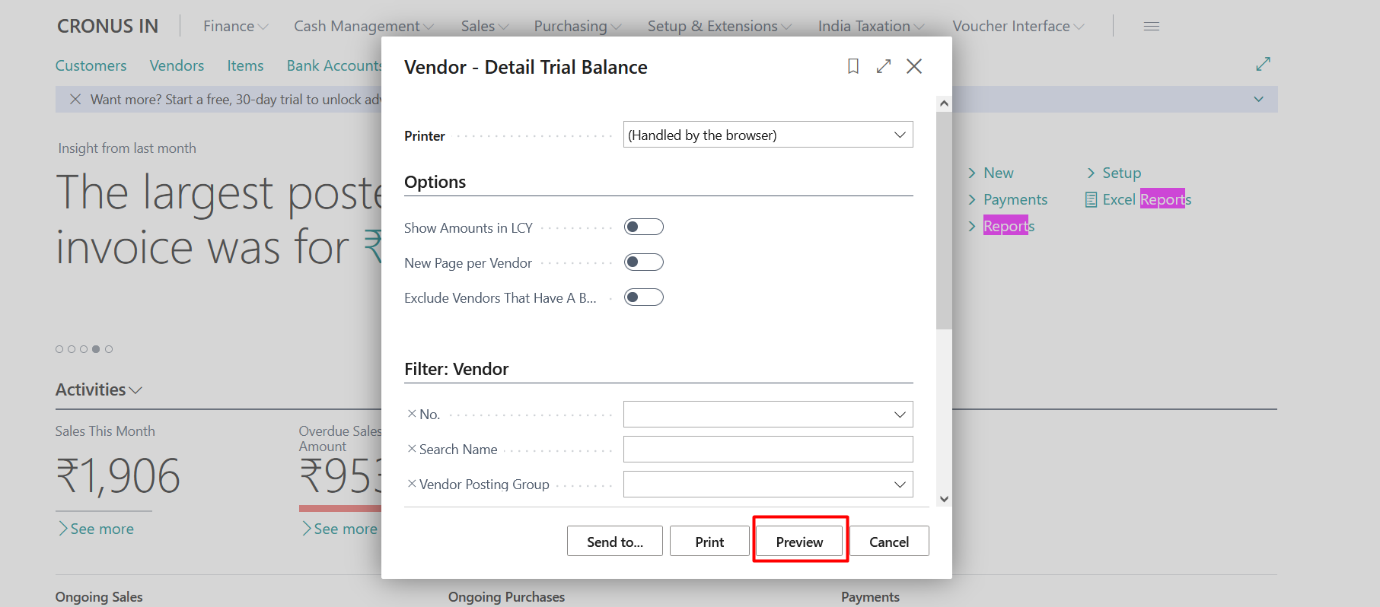
A report will be generated like below snippet.
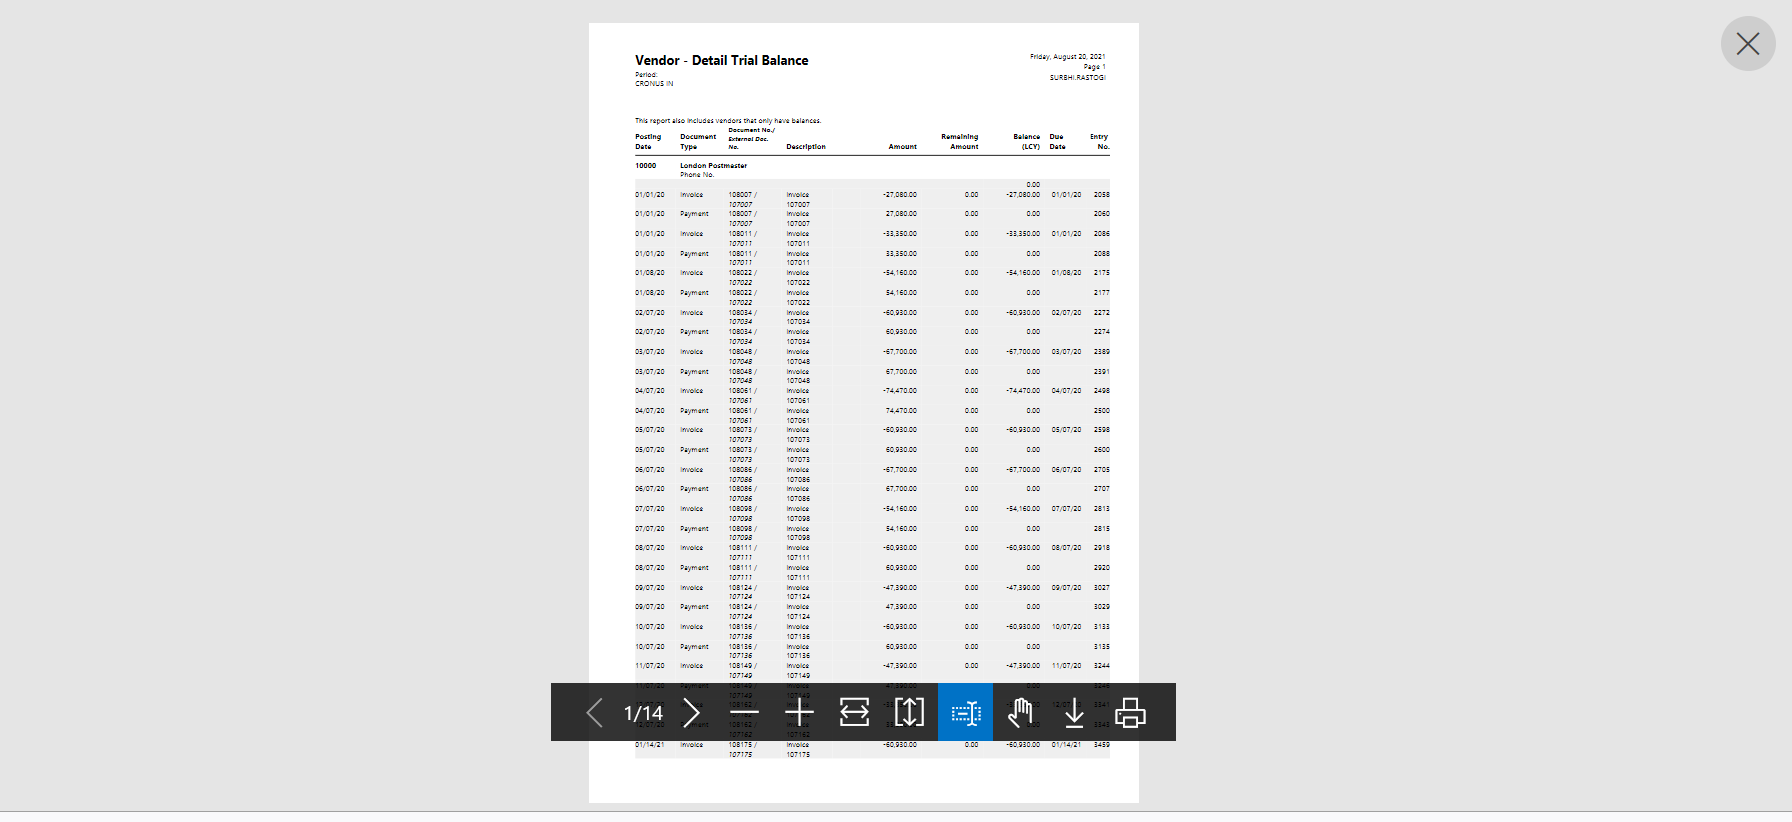
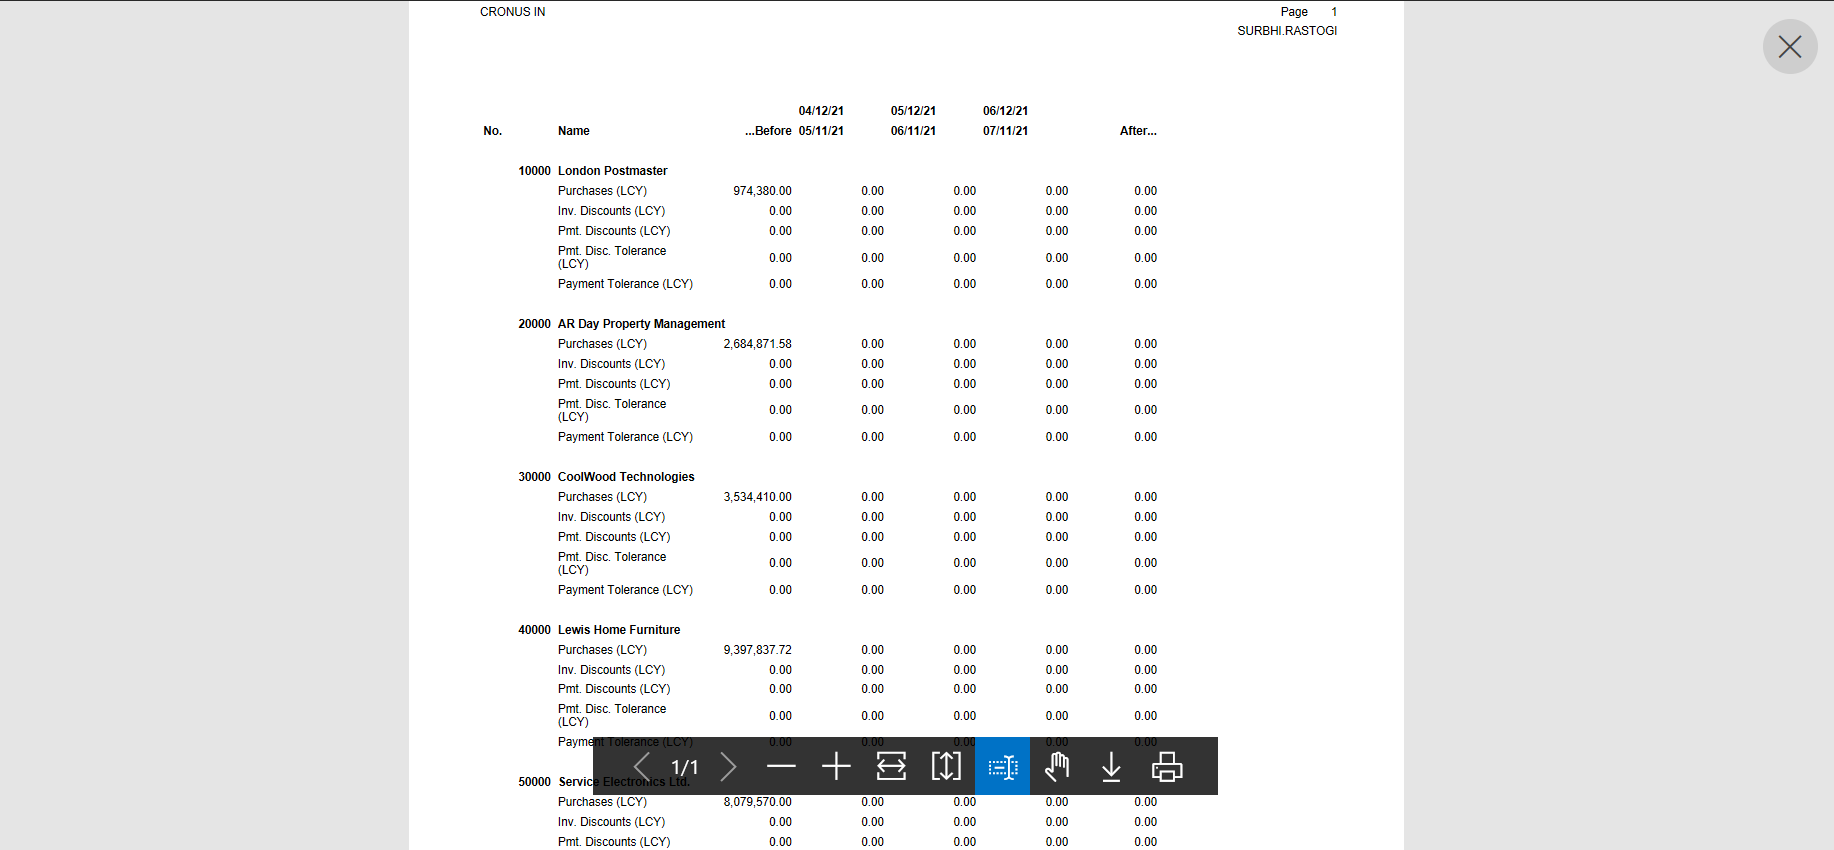
Shows purchase statistics for each vendor. This includes information for five periods, starting on the date that you specify.
The report includes the total purchases, payments, finance charges, and discount information including the payment discounts taken and lost. Statistics are calculated for purchases before the date entered, at three one-month intervals from the date entered, and for a period including all purchases made after the third one-month interval.
This report can also be used in accounts payable as it’s easier to do a quick look-up of posted payments, discounts, and other transactions for a given vendor.
Click on the search icon and enter Purchase Statistics report, and then choose the related link.
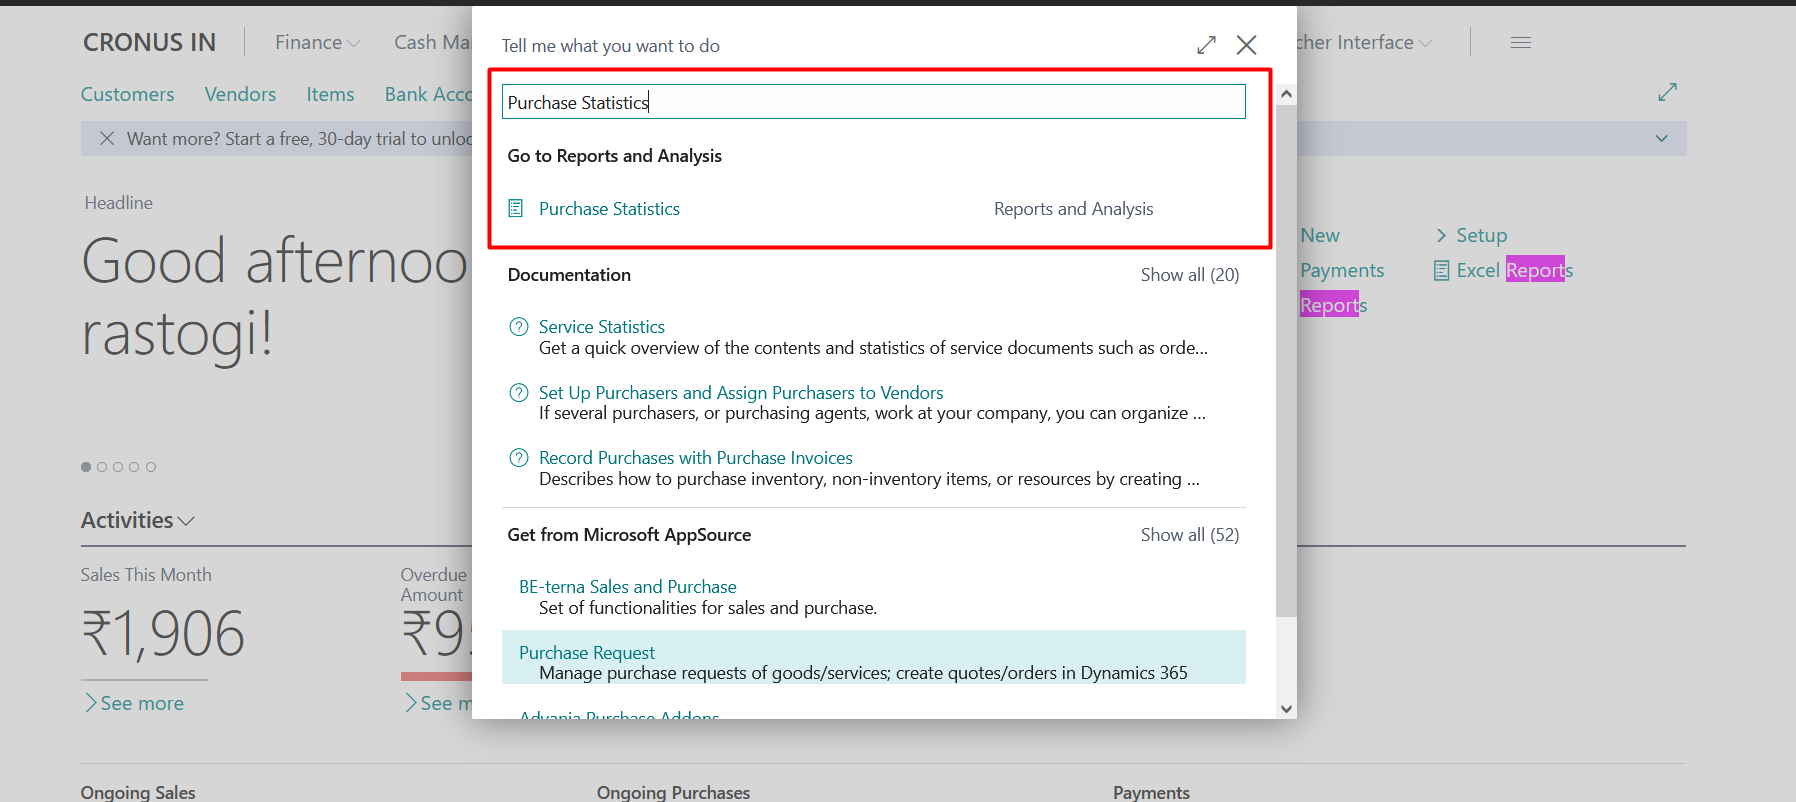
A new window will be pop out like below snippet.
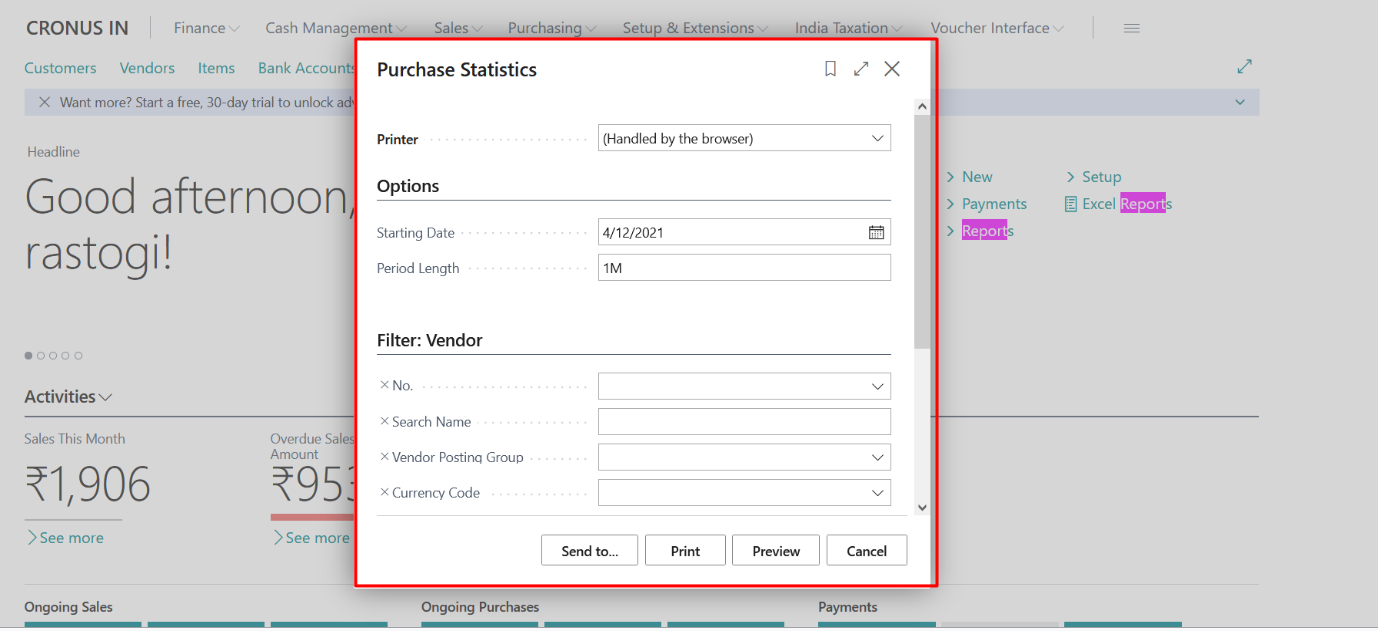
Select the required options and click on Preview to see the report preview.
Click on Preview.
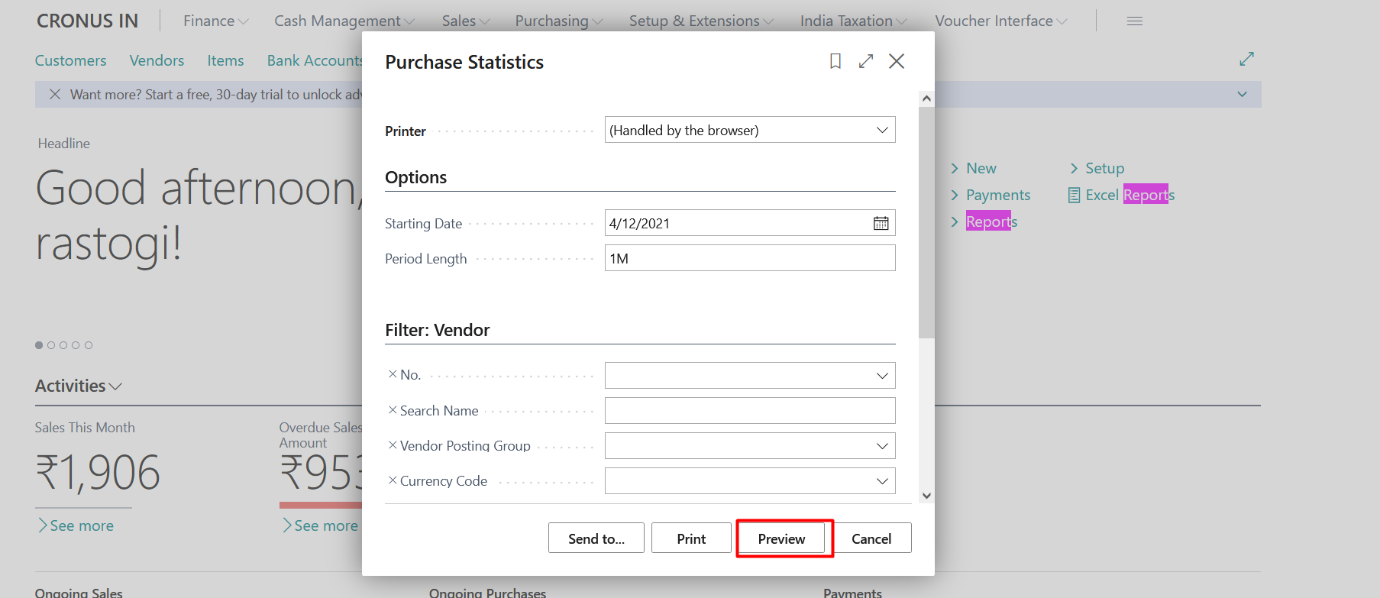
A report will be generated like below snippet.
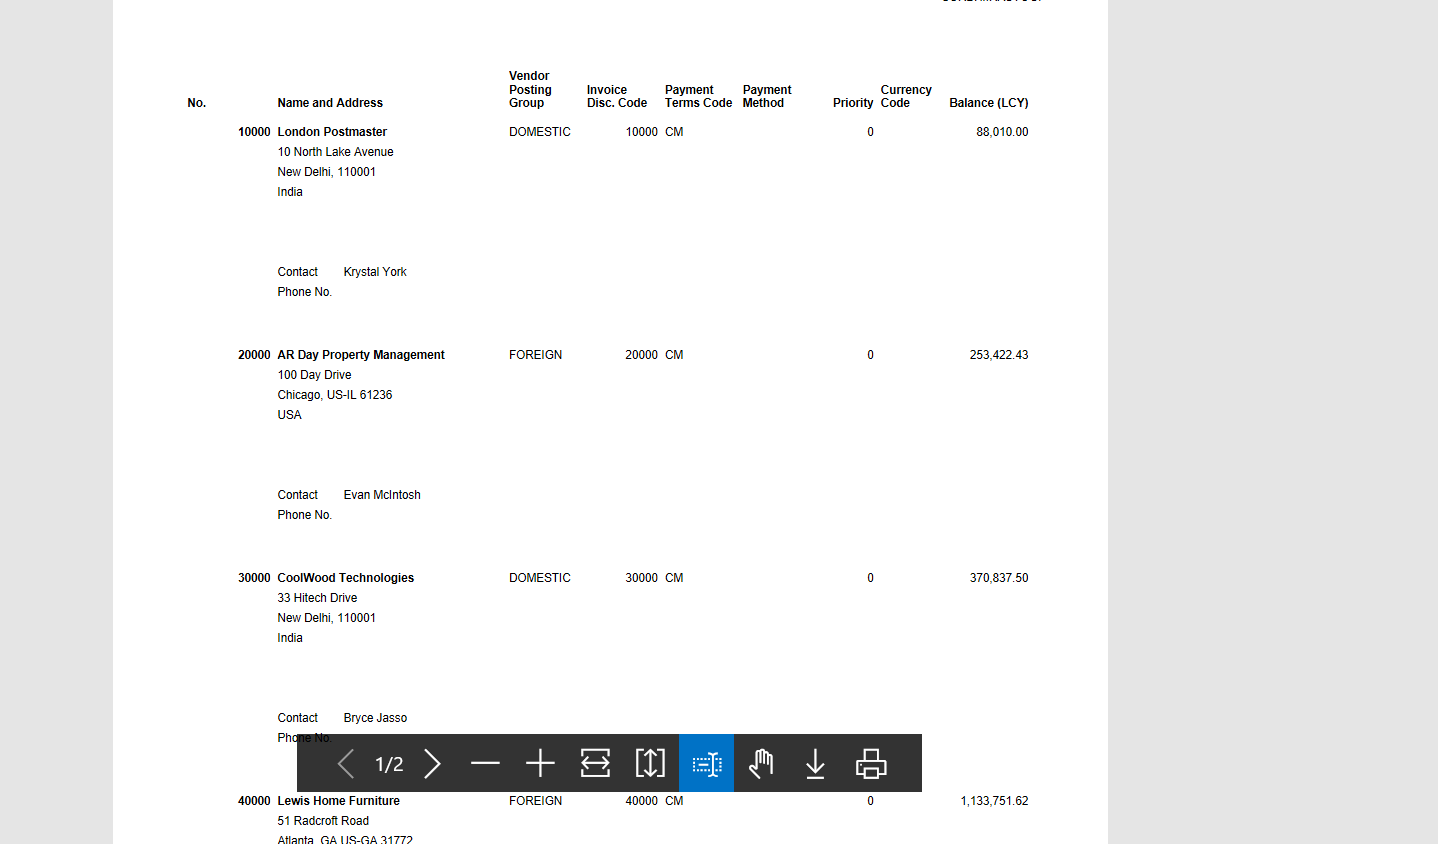
Shows various kinds of basic information for vendors, such as vendor posting group, discount and payment information, priority level and the vendor’s default currency, and the vendor’s current balance (in LCY). The report can be used, for example, to maintain the information in the Vendor table.
Click on the search icon and enter Vendor-List report, and then choose the related link.

A new window will be pop out like below snippet.
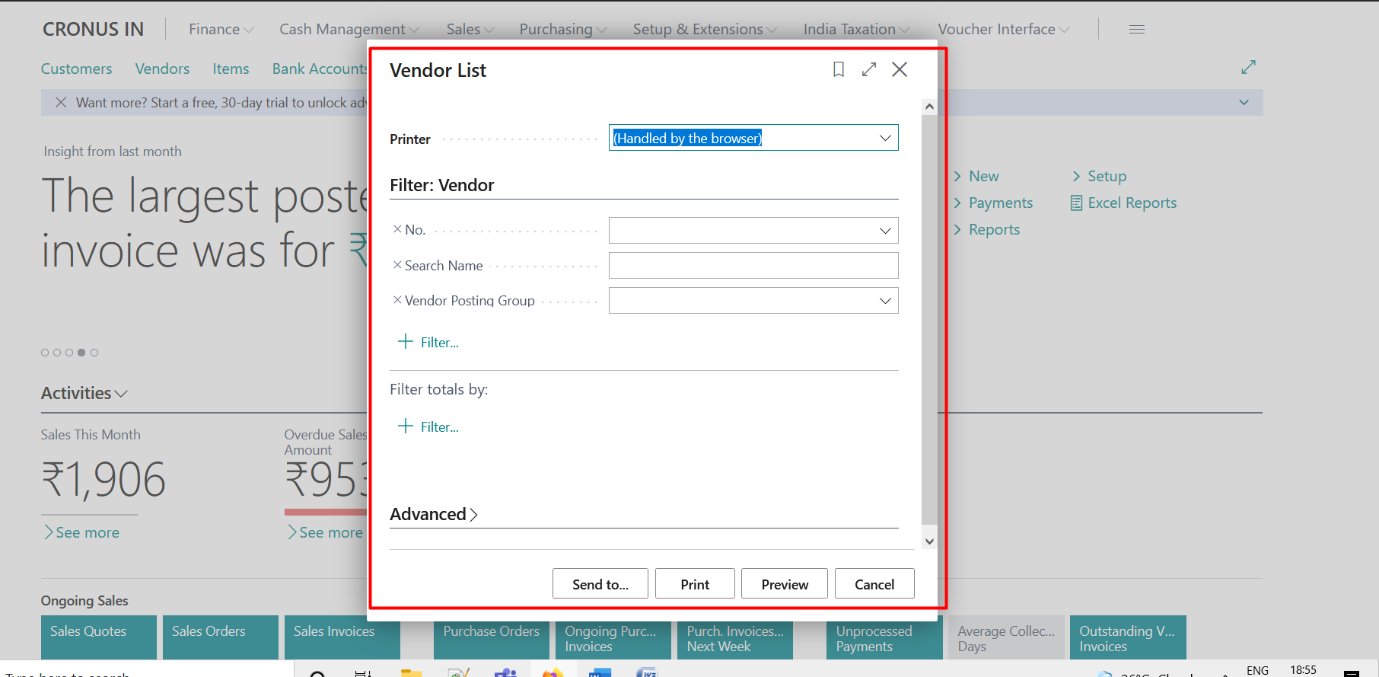
Select the required options and click on Preview to see the report preview.
Click on Preview.
A report will be generated like below snippet.
https://docs.microsoft.com/en-us/dynamics365/business-central/receivables-reports
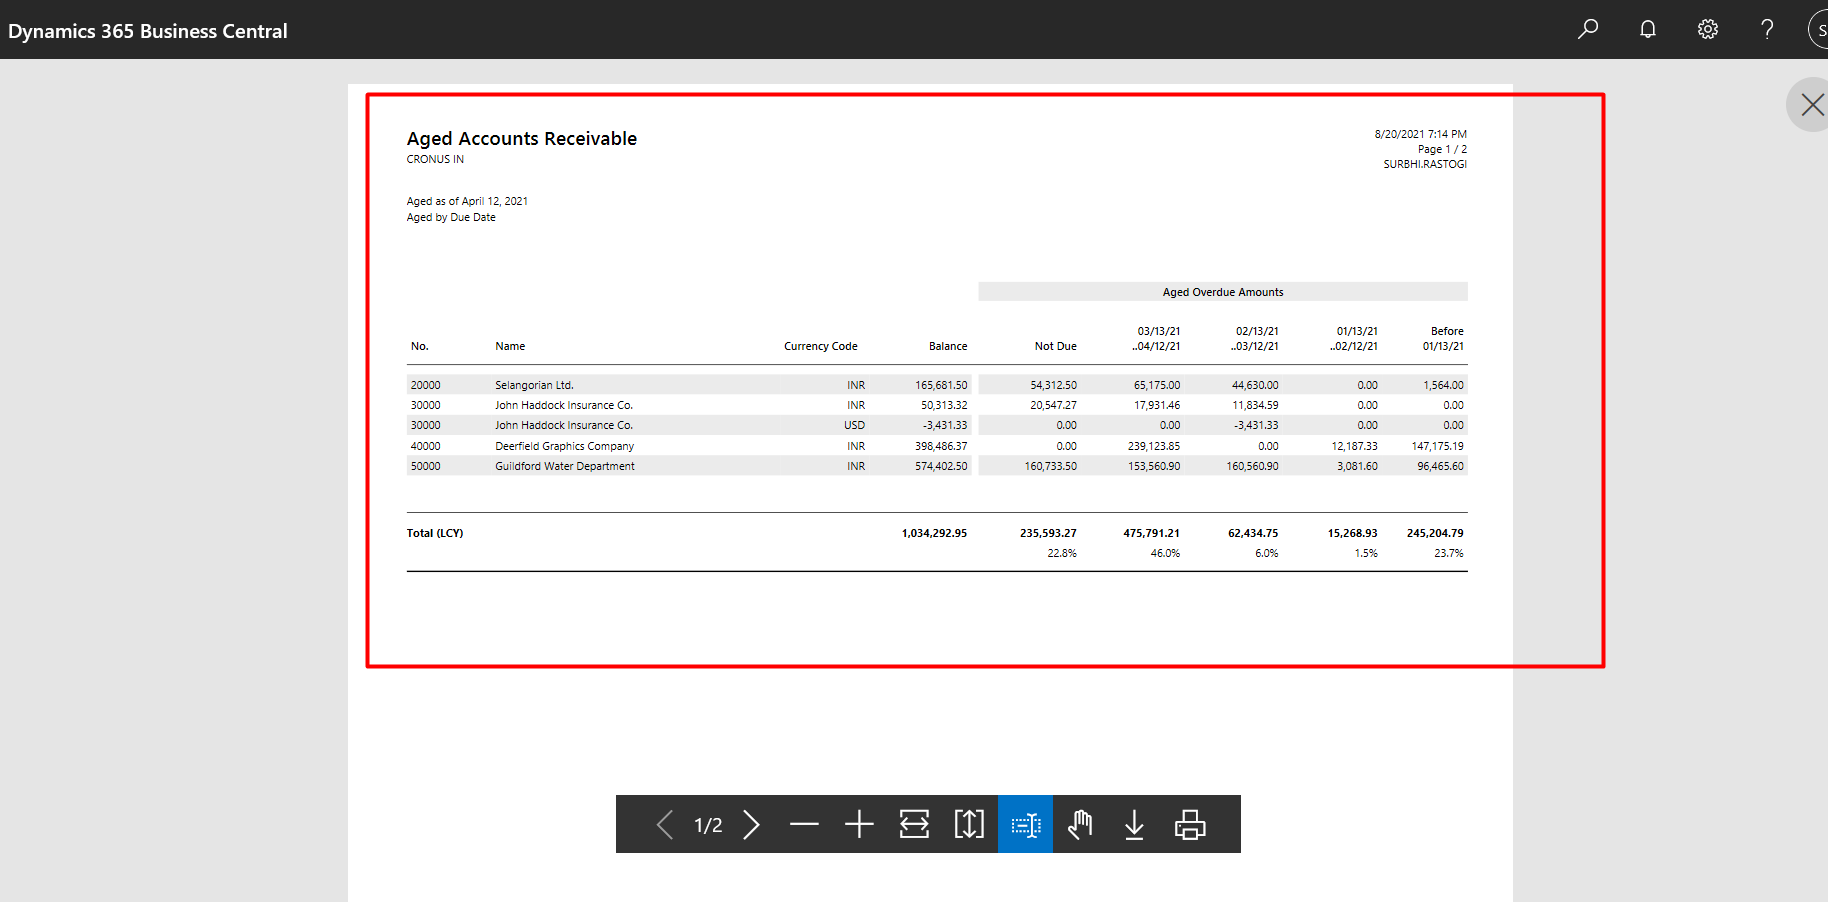
Shows the amount outstanding with customers broken down into time intervals for the overdue time. The report also displays the part of the customers’ balance that is not due and can be shown with or without document details for each customer. This report is the main report for reconciling customer ledger to G/L. Assuming you have not allowed direct posting to the accounts used in the customer posting groups’ receivables account, this report is a specification of the amounts you find in G/L.
Click on the search icon and enter Aged Accounts Receivables report, and then choose the related link.
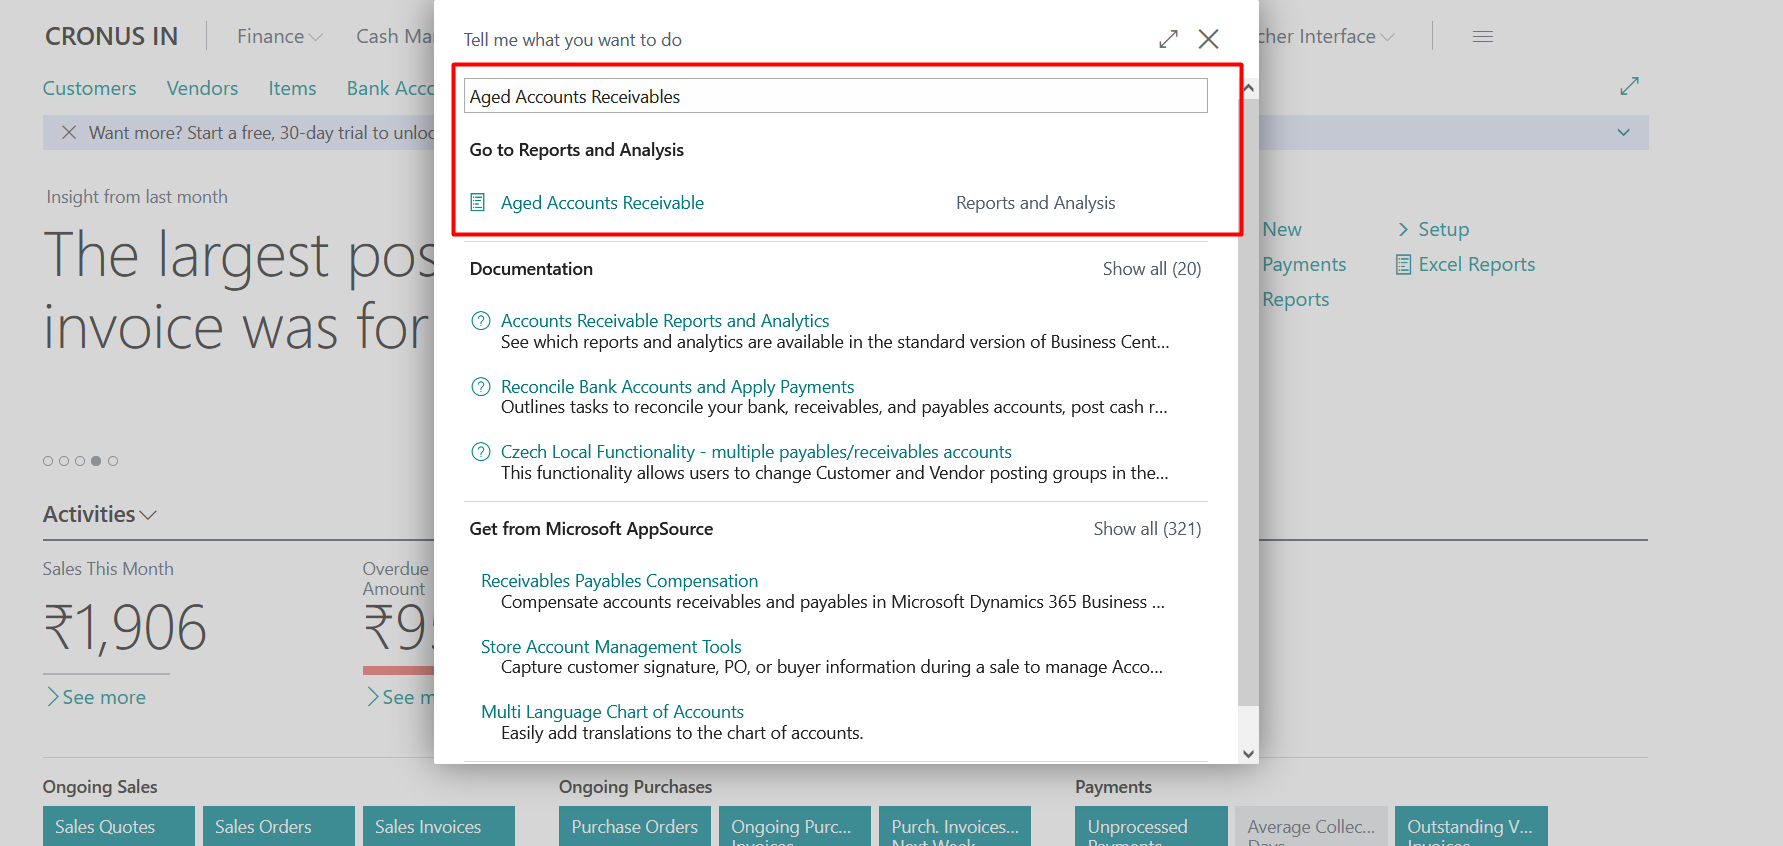
A new screen will be pop out like below
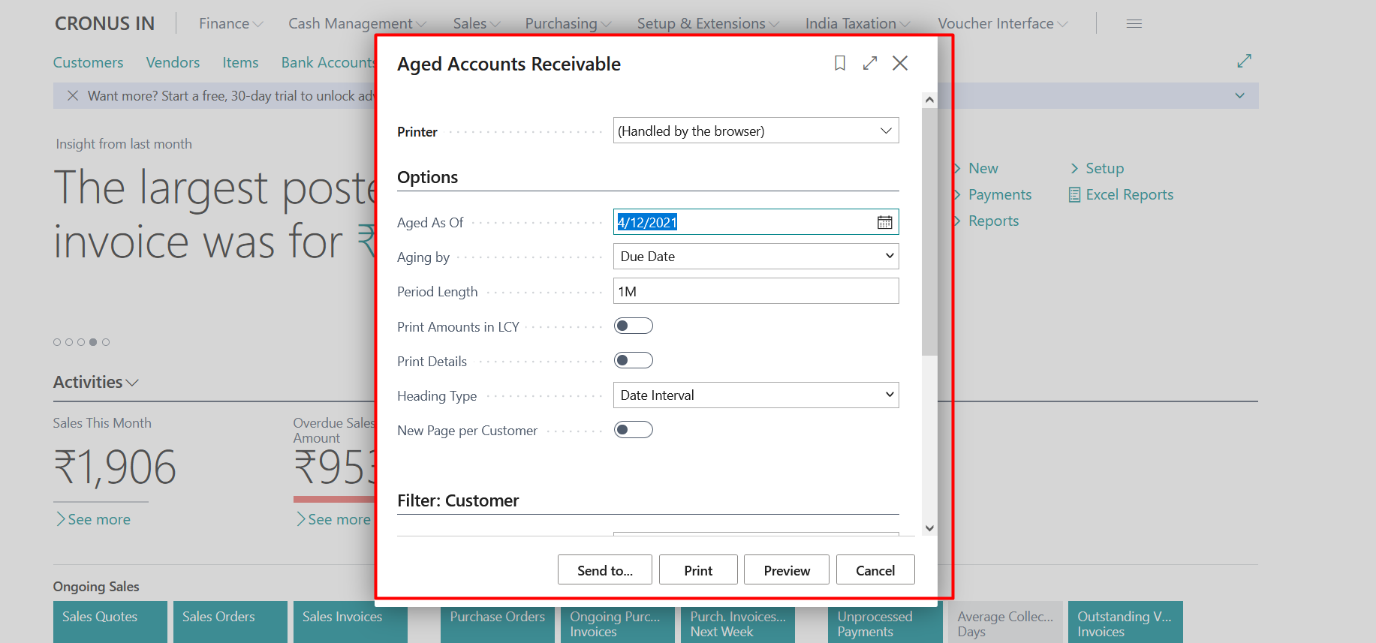
Select the options and click on Preview to see the report.
You can see the reports like below snippet.
Generates a customer statement for a specified time interval. It’s usually sent to the customers to give them an overview of outstanding amounts and also as a reminder to pay any overdue amounts. You can choose to show the overdue amounts in a separate section. You can include an aging band similar to the one used in the Aged Receivables report. For the aging band, you typically set 30D, which means 30 days intervals such as30, 60, 90, and 90+ days overdue, from the ending date, or 1M+CM, which will be the current month in a separate interval and then monthly intervals for the preceding months. Note: In the customer list, this report also has a separate action, Scheduled Statements. This option does not filter to the customer you have selected. It’s the same report but used when you want to send statement to all/more customers.
Click on the search icon and enter Customer Statement report, and then choose the related link.
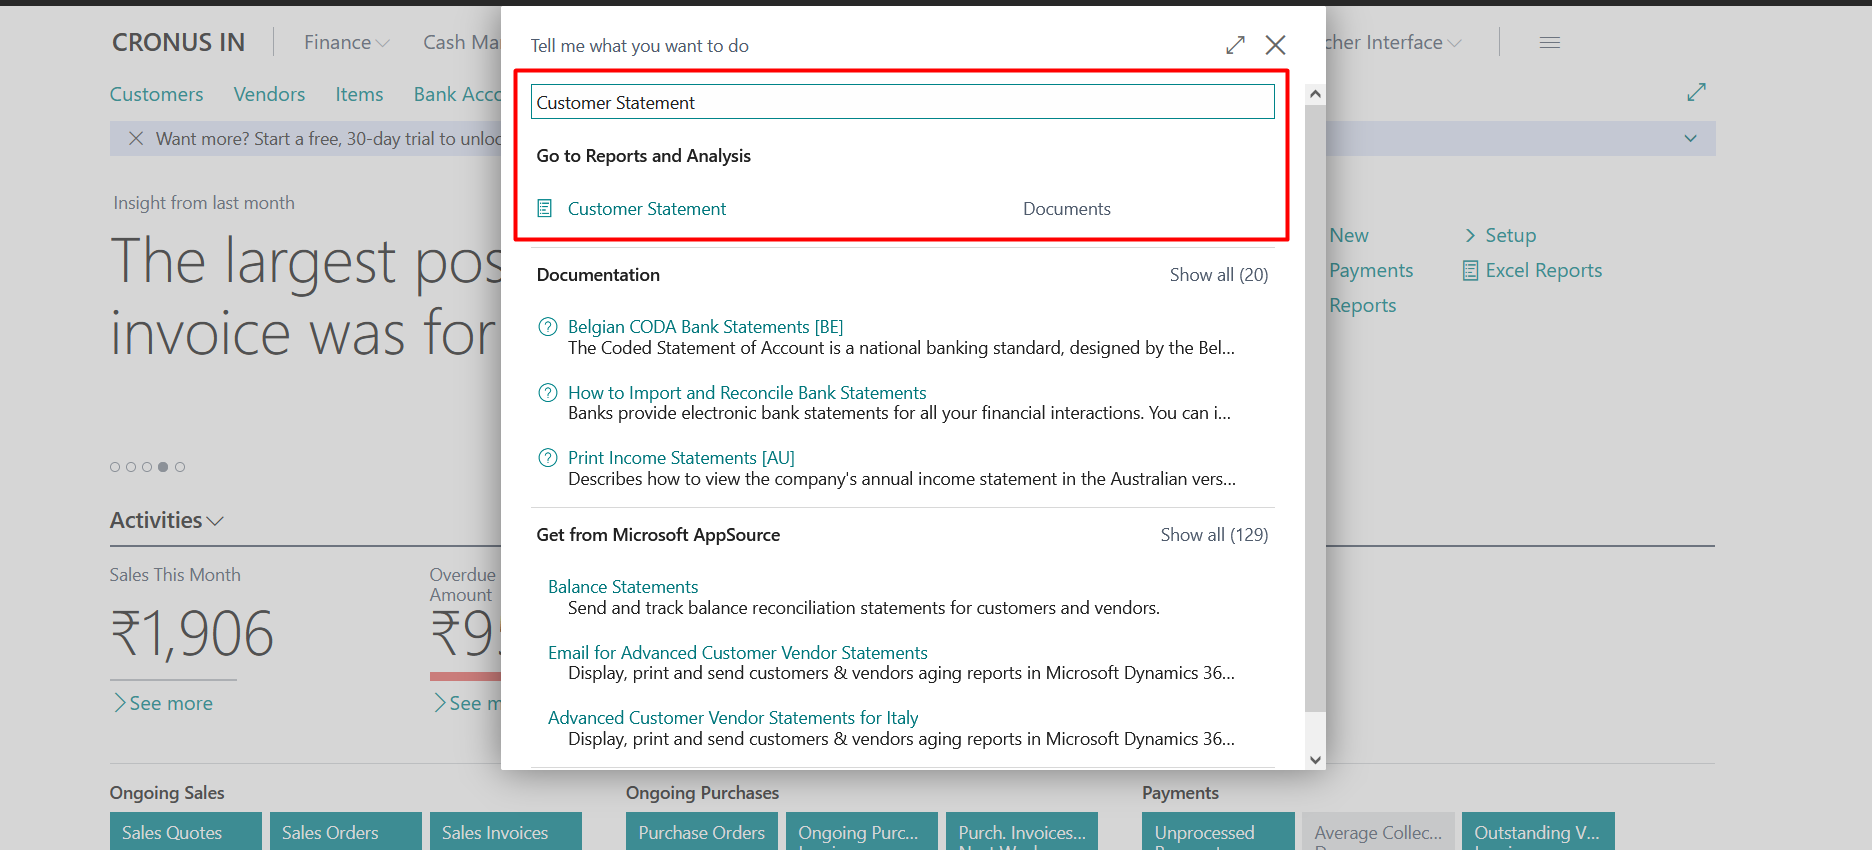
A new window will be pop out like below snippet.
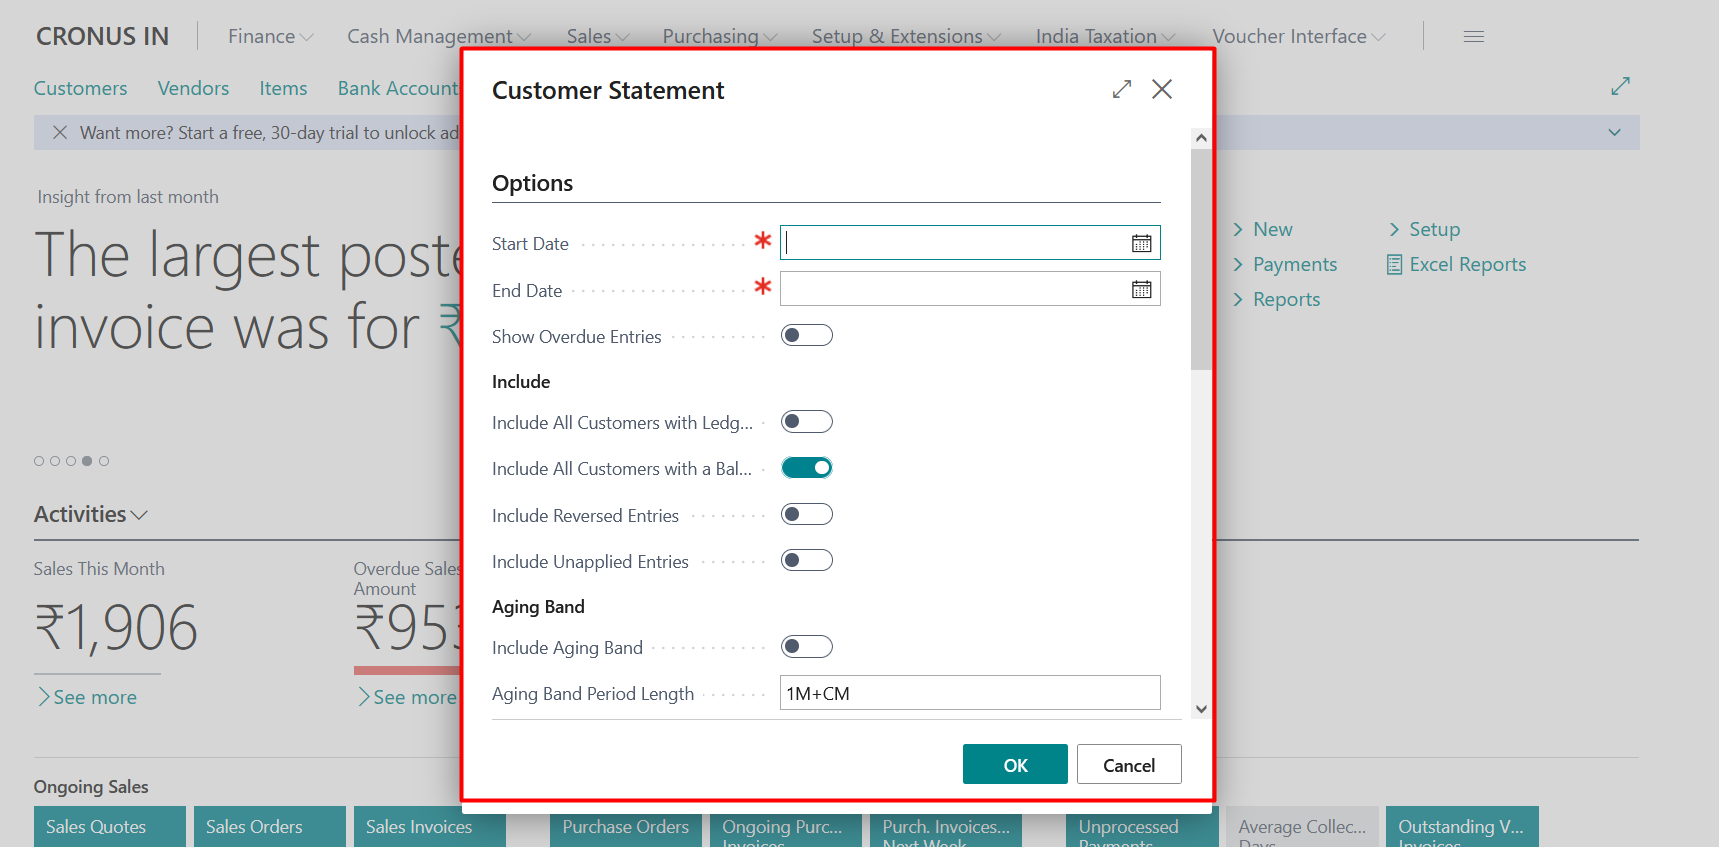
Select the required options and click on Preview to see the report preview.
Note: You need to provide a Start Date and End Date.
Click on Preview.
A PDF report will be generated like below snippet.
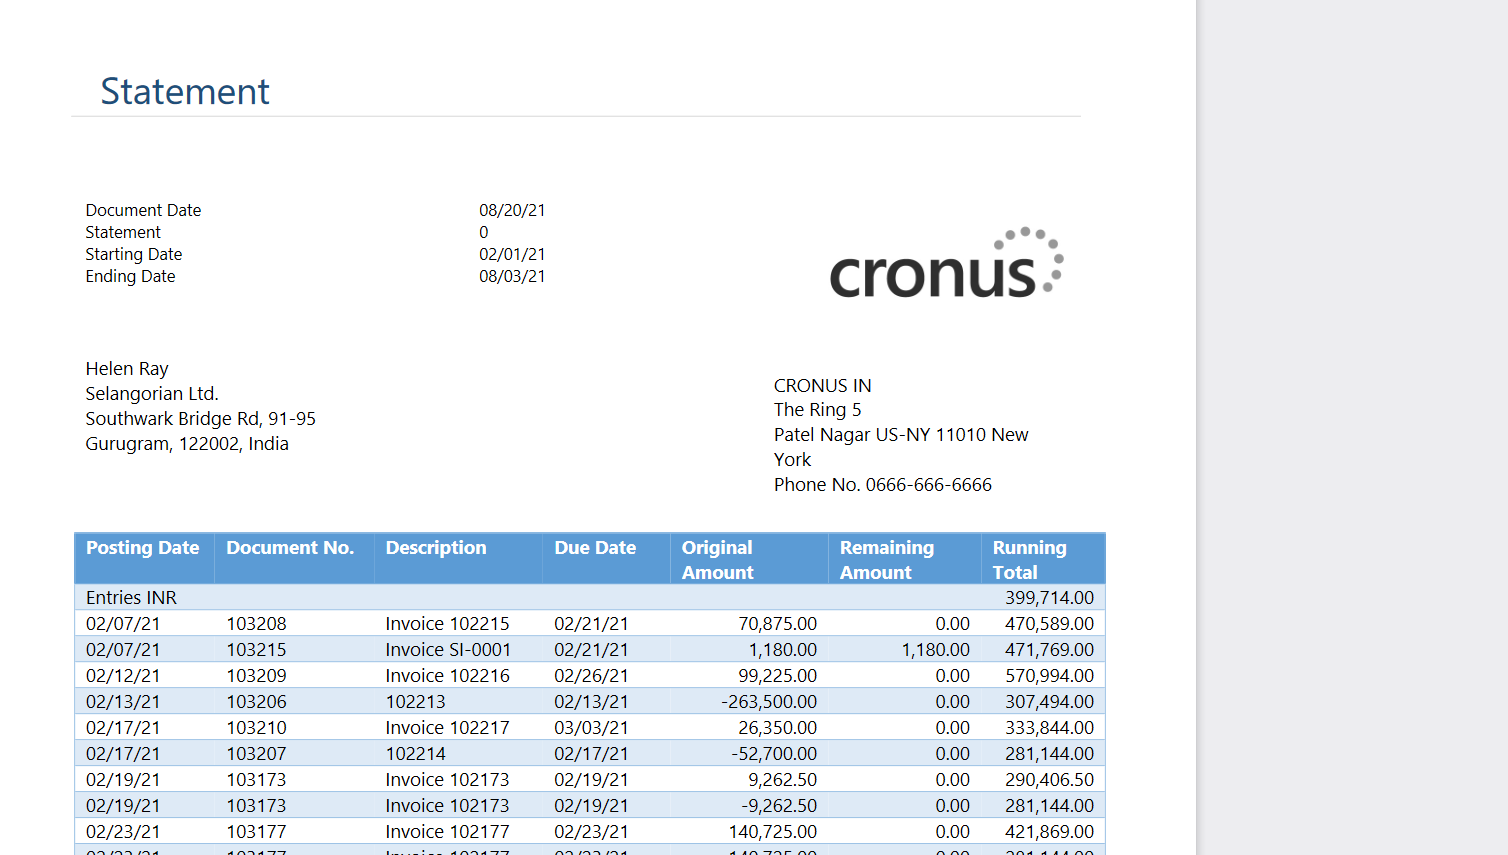
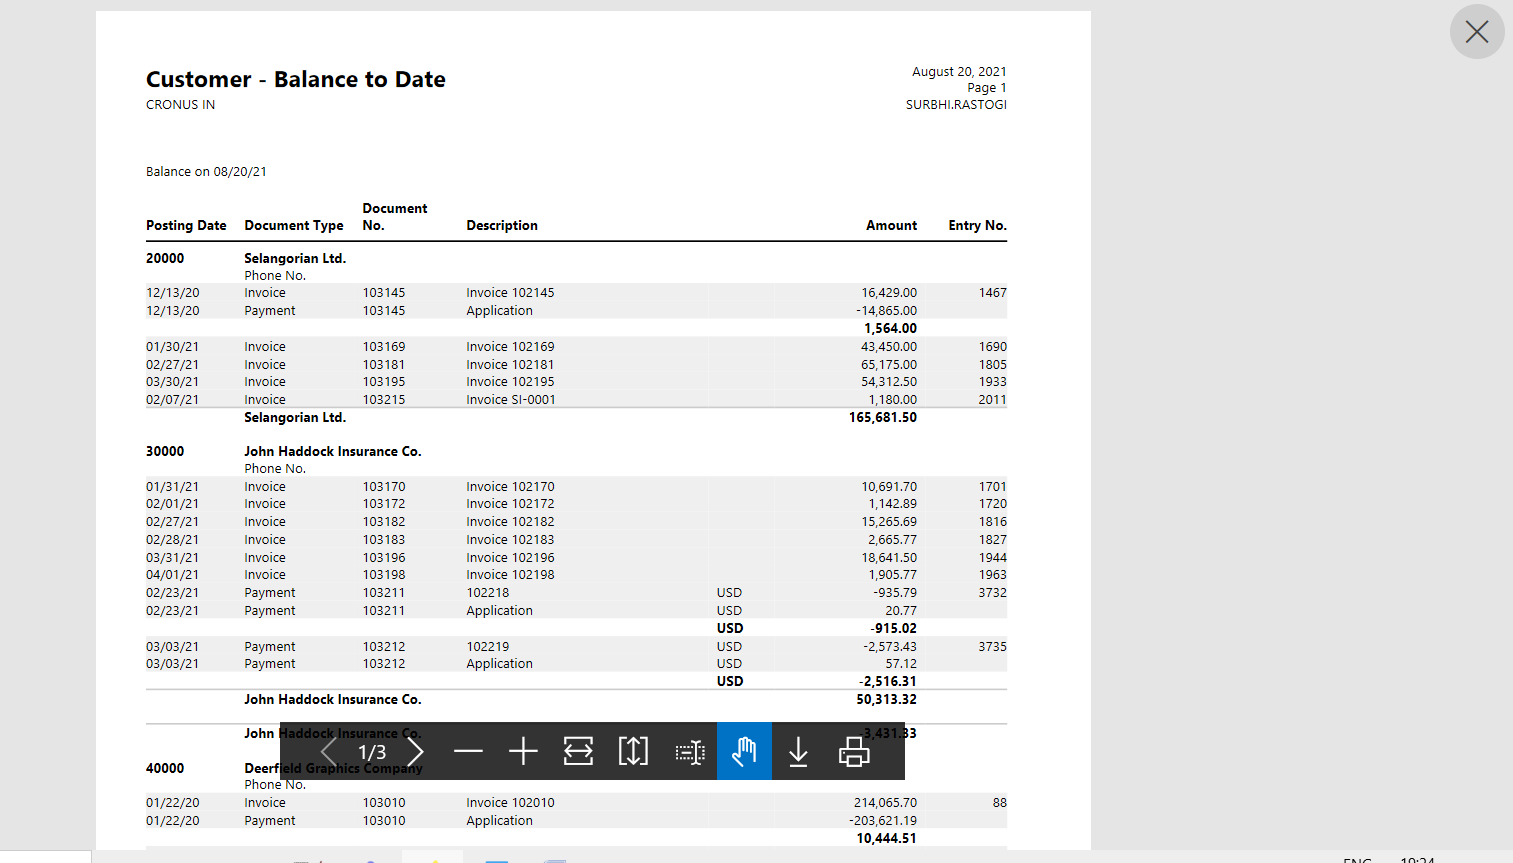
Shows the open customer ledger entries until the ending date. This report shows similar content as the customer statement but with no indication if the entry is overdue. Note: The date filter will be applied to the detailed customer ledger entries. This means that if you have payments later than the ending date that have been applied to invoices in within the date range, the invoices will appear in the report as they have not been closed as per the ending date
Click on the search icon and enter Customer –Balance to date report, and then choose the related link.
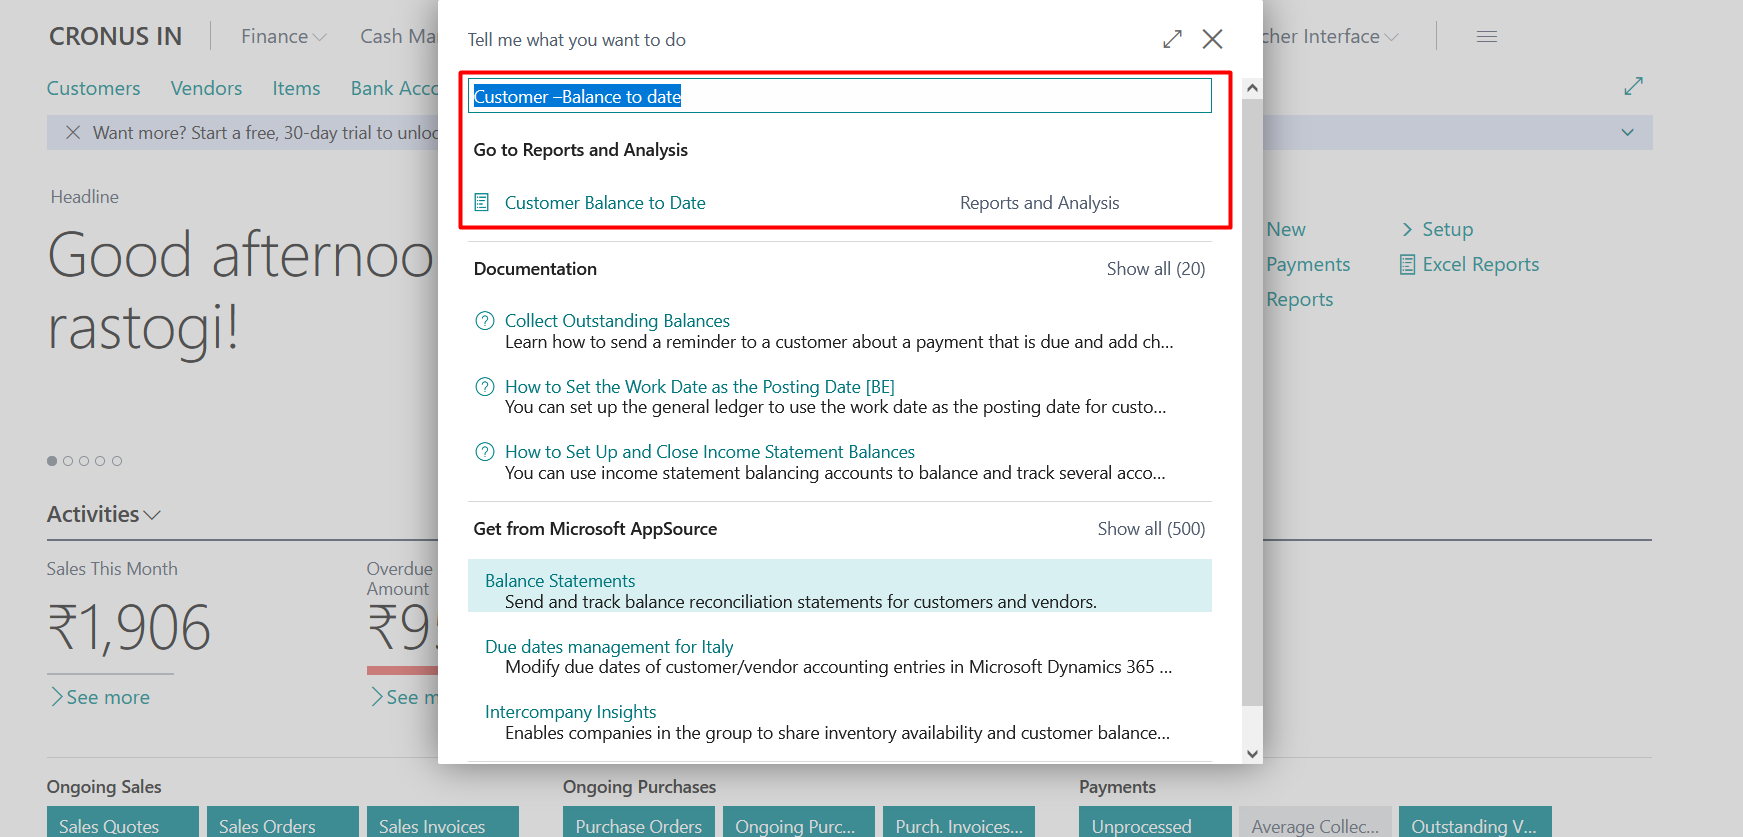
A new window will be pop out like below snippet.
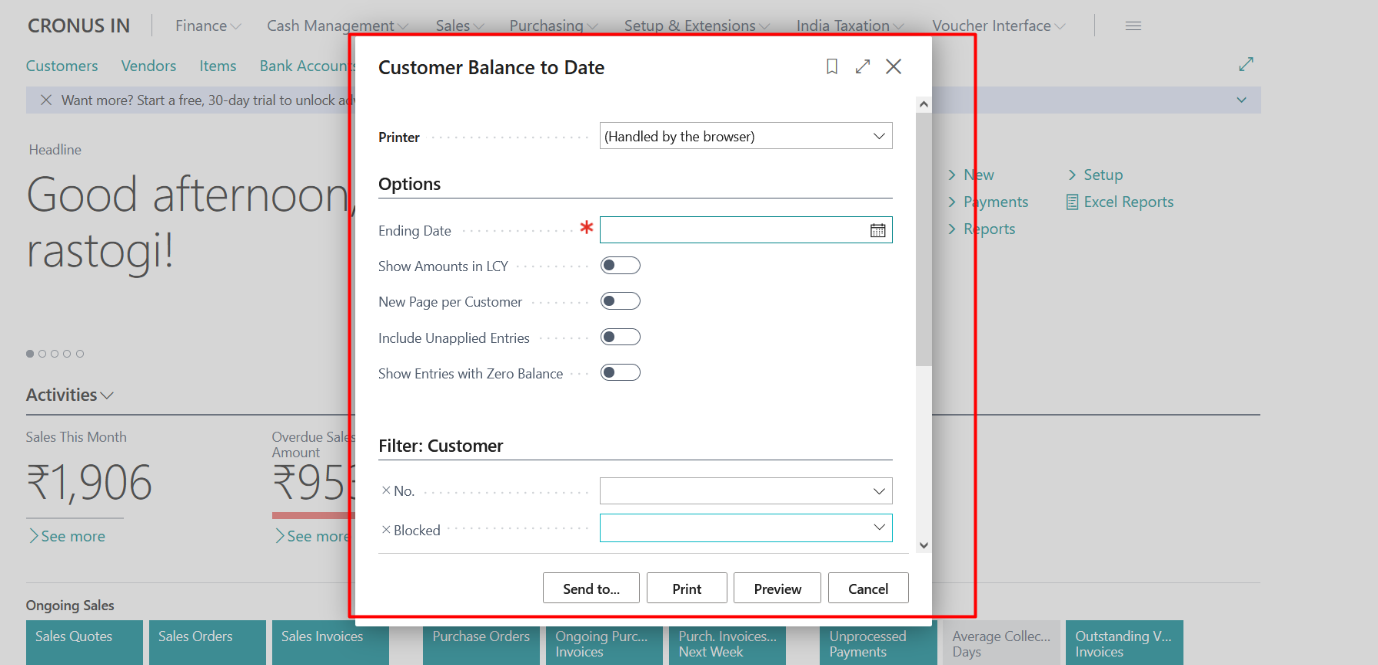
Select the required options and click on Preview to see the report preview.
Click on Preview.
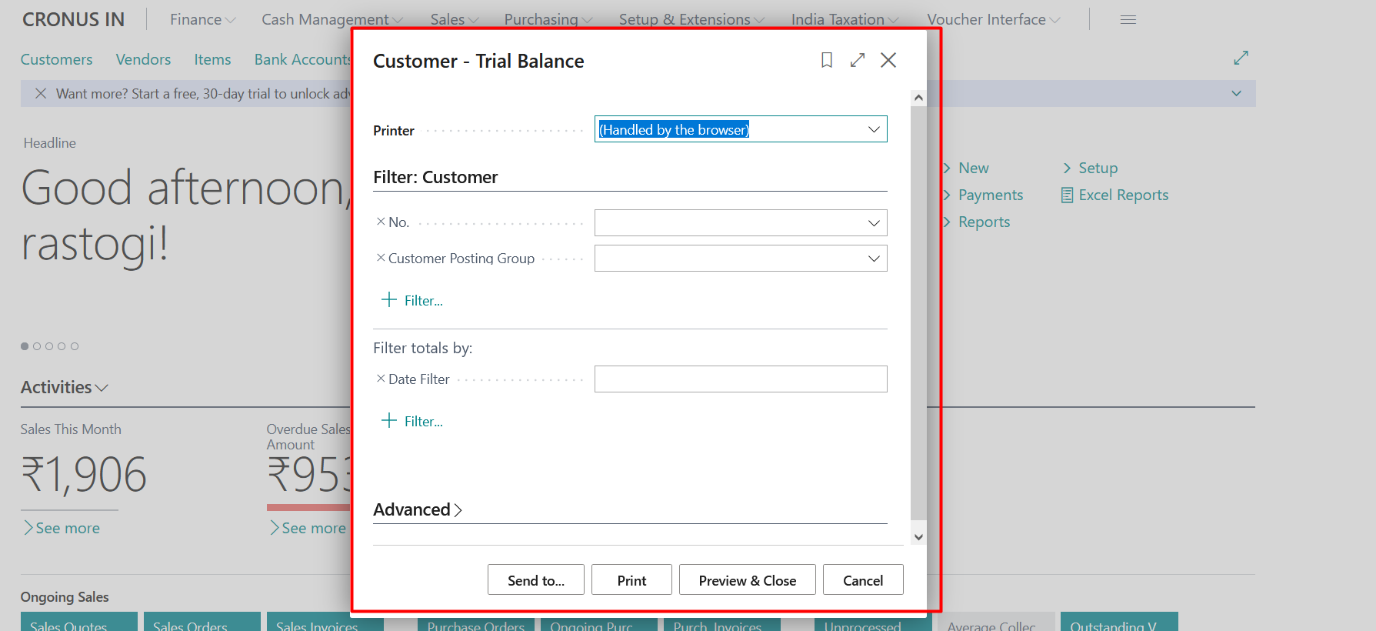
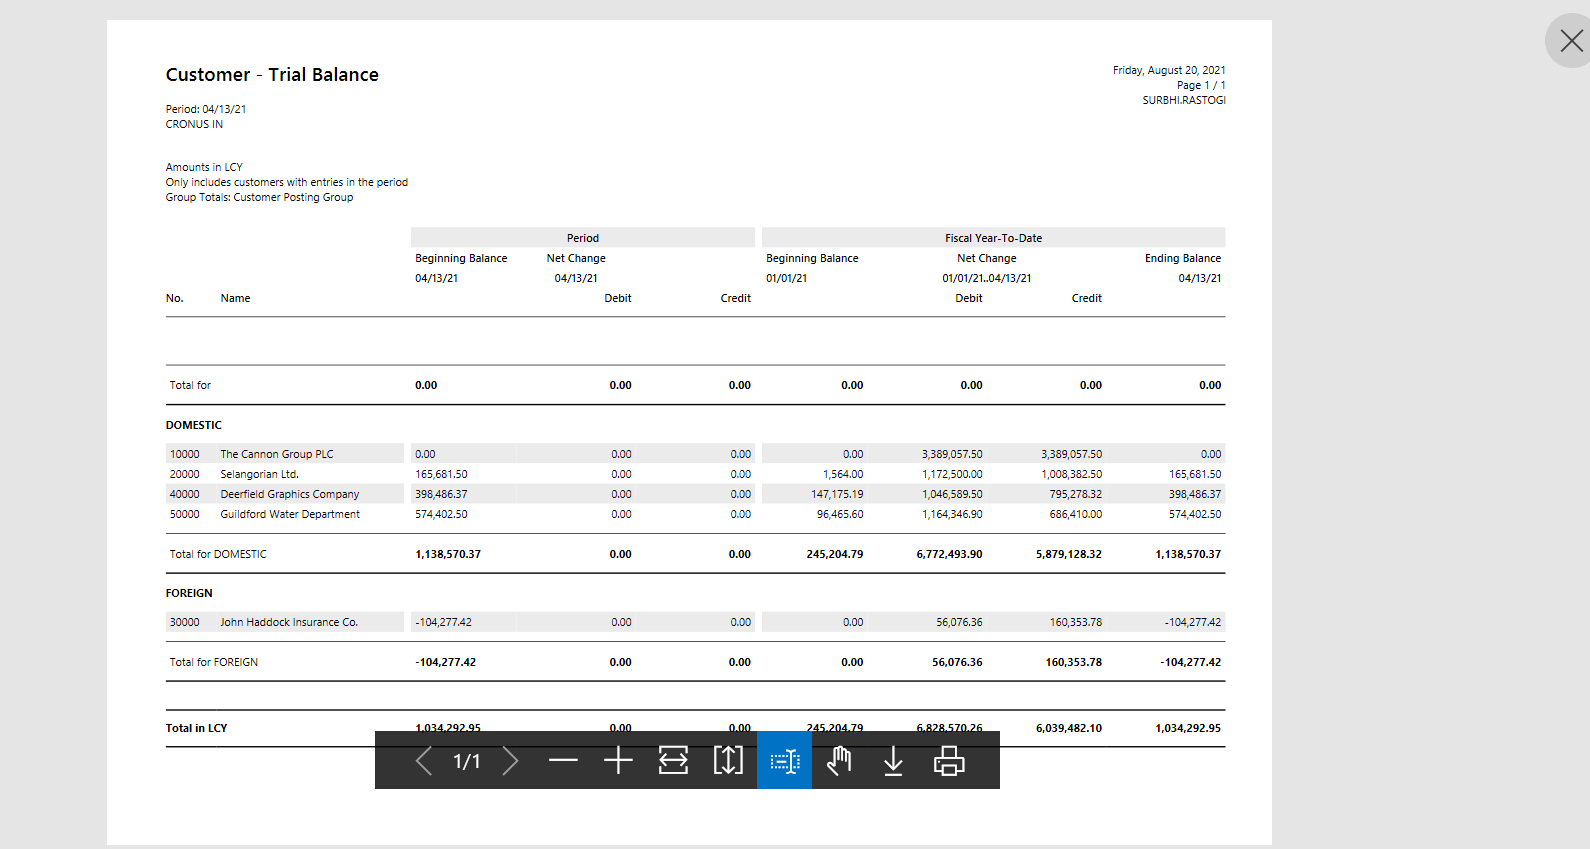
Shows the net changes for customers for the period specified in the date filter as well as the net change year-to-date for the fiscal year corresponding to the period selected. The report is grouped by customer posting groups and will give a different view of the customer ledger than the Aged Account Receivables report. Note: If you haven’t set up any accounting period, the system will not know what fiscal year to use and will either show year-to-date from the most recent fiscal year defined or just select the period, which may or may not be from beginning of a year.
Click on the search icon and enter Customer Trial Balance report, and then choose the related link.
A new window will be pop out like below snippet.
A report will be generated like below snippet.
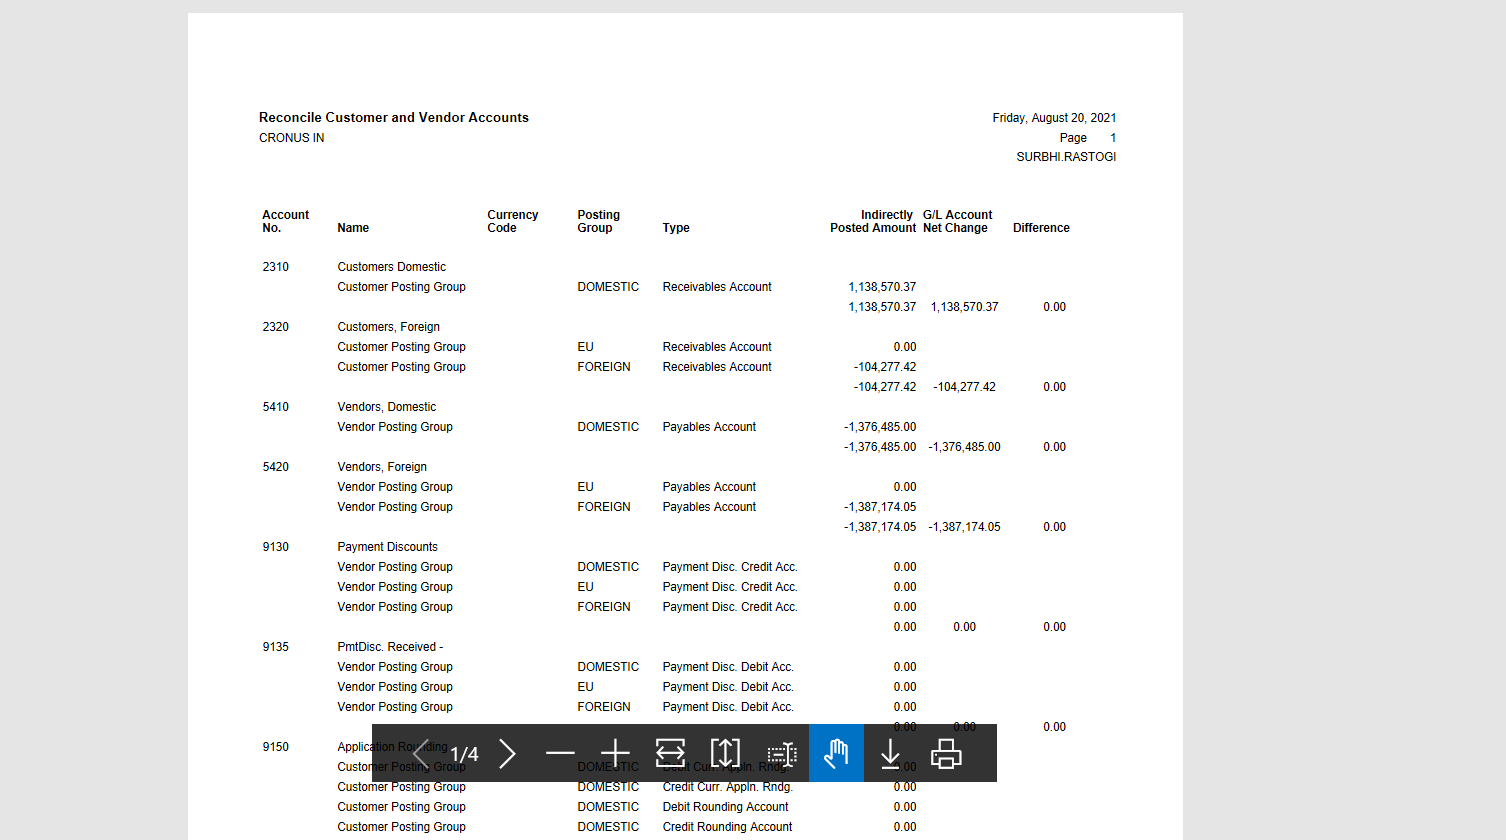
Shows the G/L entries resulting from posting customer and vendor entries split per G/L account and posting groups. This report is used for reconciling the balances on customer and vendor ledgers to general ledger balances.
Click on the search icon and enter Reconcile Customer and Vendor Accounts report, and then choose the related link.
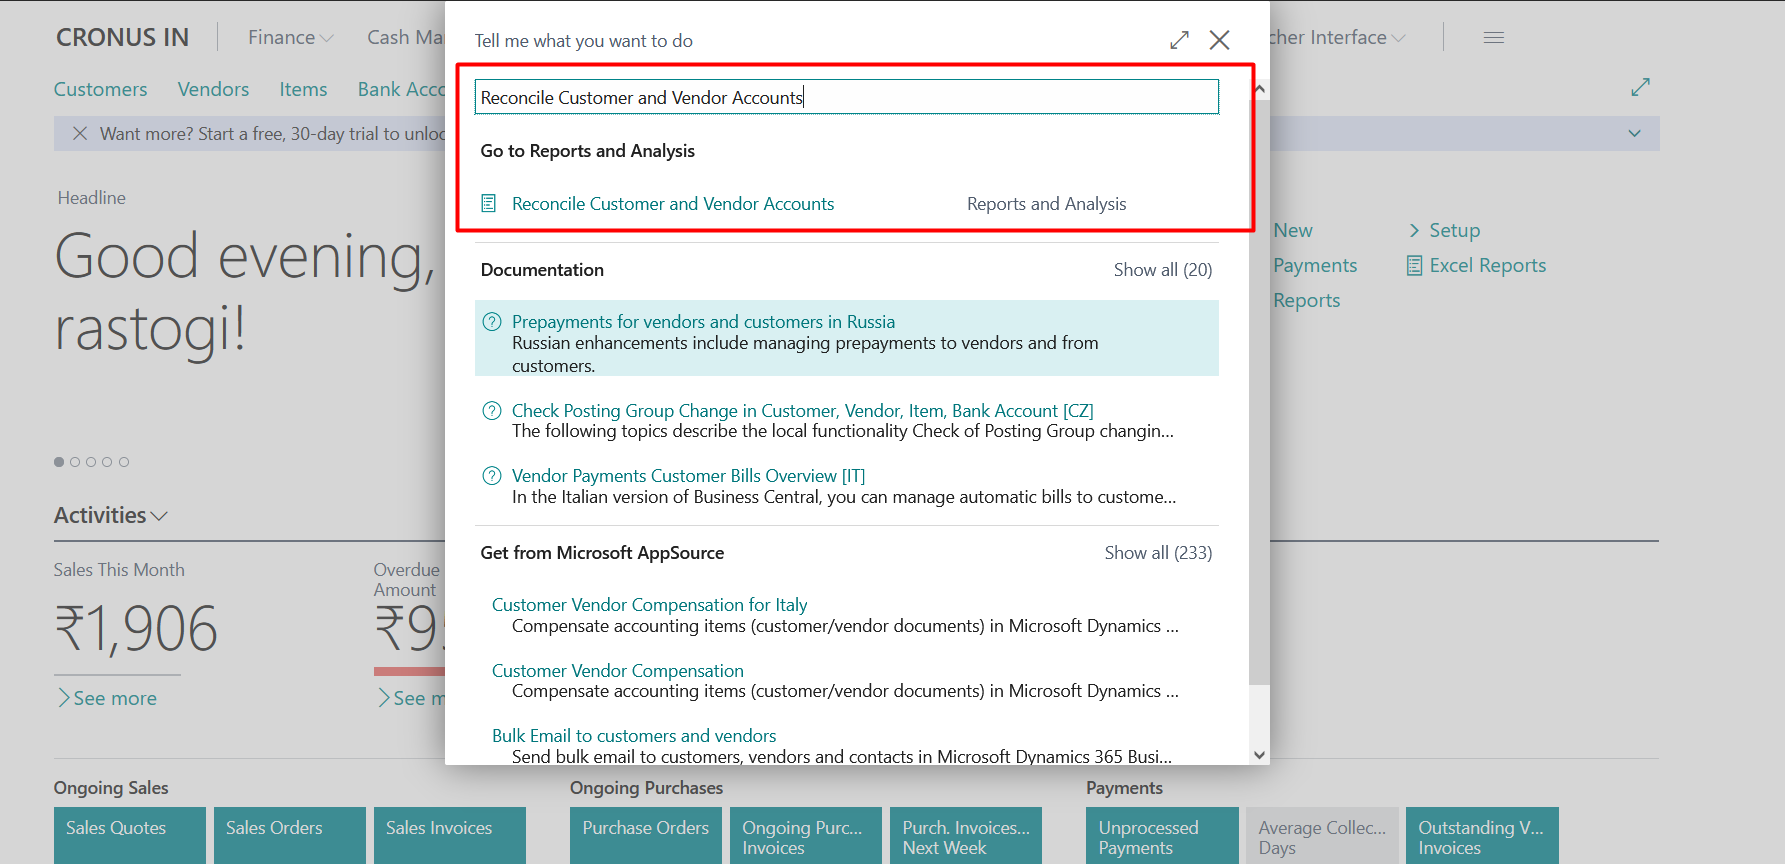
A new window will be pop out like below snippet.
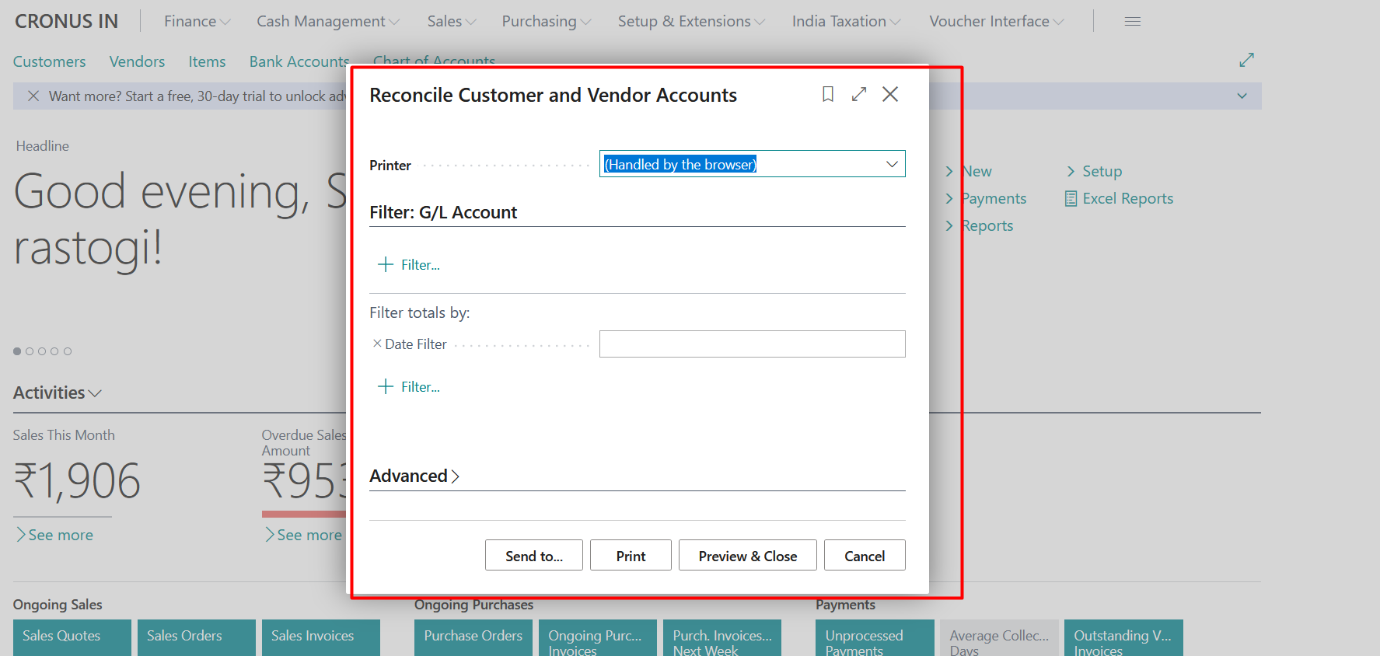
Select the required options and click on Preview to see the report preview.
Click on Preview.
A report will be generated like below snippet.
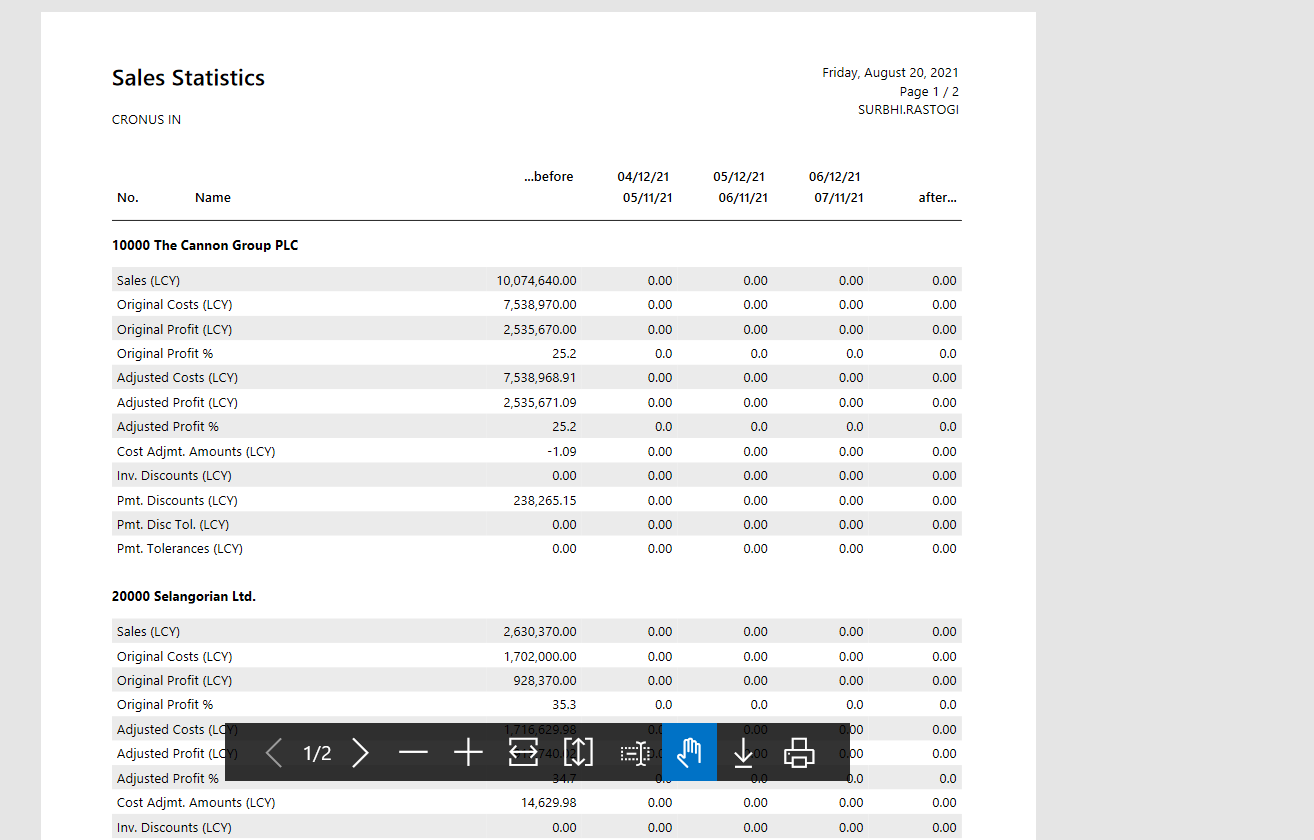
Shows amounts for sales, profit, invoice discount, and payment discount in LCY, and the profit percentage for each customer. The costs and profits are given as both the original and adjusted amounts. The original costs and profits are those values that were calculated at the time of posting, and the adjusted costs and profits reflect changes to the original costs of the items in the sales. The cost adjustment amount shown in the report is the difference between the original cost and the adjusted cost.
The figures are divided into three periods. You can select the length of the period, starting on a selected date. There are also columns for amounts before and after the three periods. Use the report to analyze earnings from an individual customer and earnings trends, for example.
This report can also be used in accounts receivable as it’s easier to do a quick look-up of posted payments, discounts, and sales for a given customer.
Click on the search icon and enter Sales Statistics report, and then choose the related link.
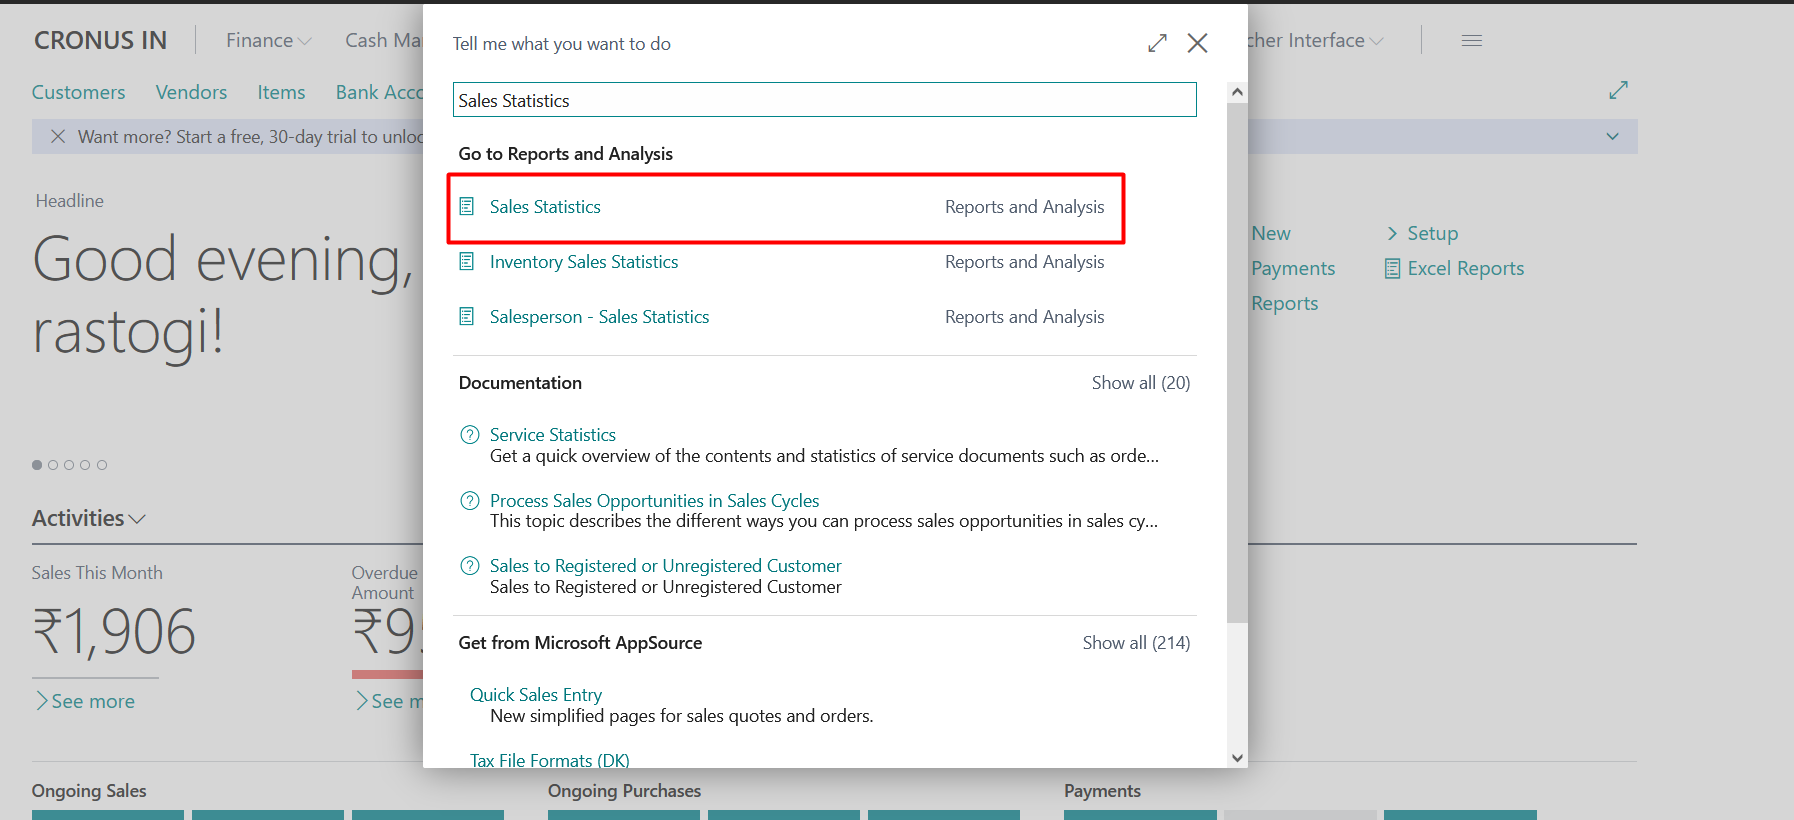
A new window will be pop out like below snippet.
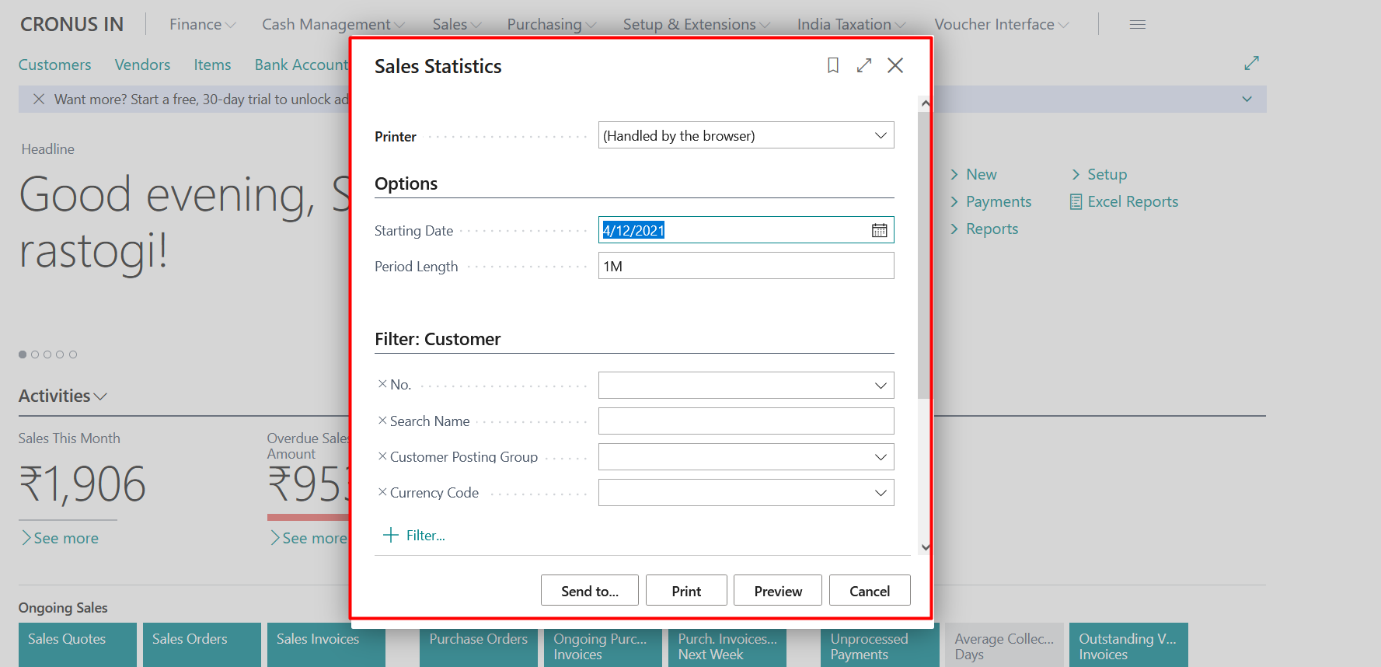
Select the required options and click on Preview to see the report preview.
Click on Preview.
The system will generate a report resembling the following snippet.
Shows various kinds of basic information for customers, such as customer posting group, discount group, finance charge and payment information, salesperson, the customer’s default currency and credit limit in your local currency (LCY), and the customer’s current balance (in LCY).You can use this report, for example, to maintain the information in the Customer table.
Click on the search icon and enter Customer List report, and then choose the related link.
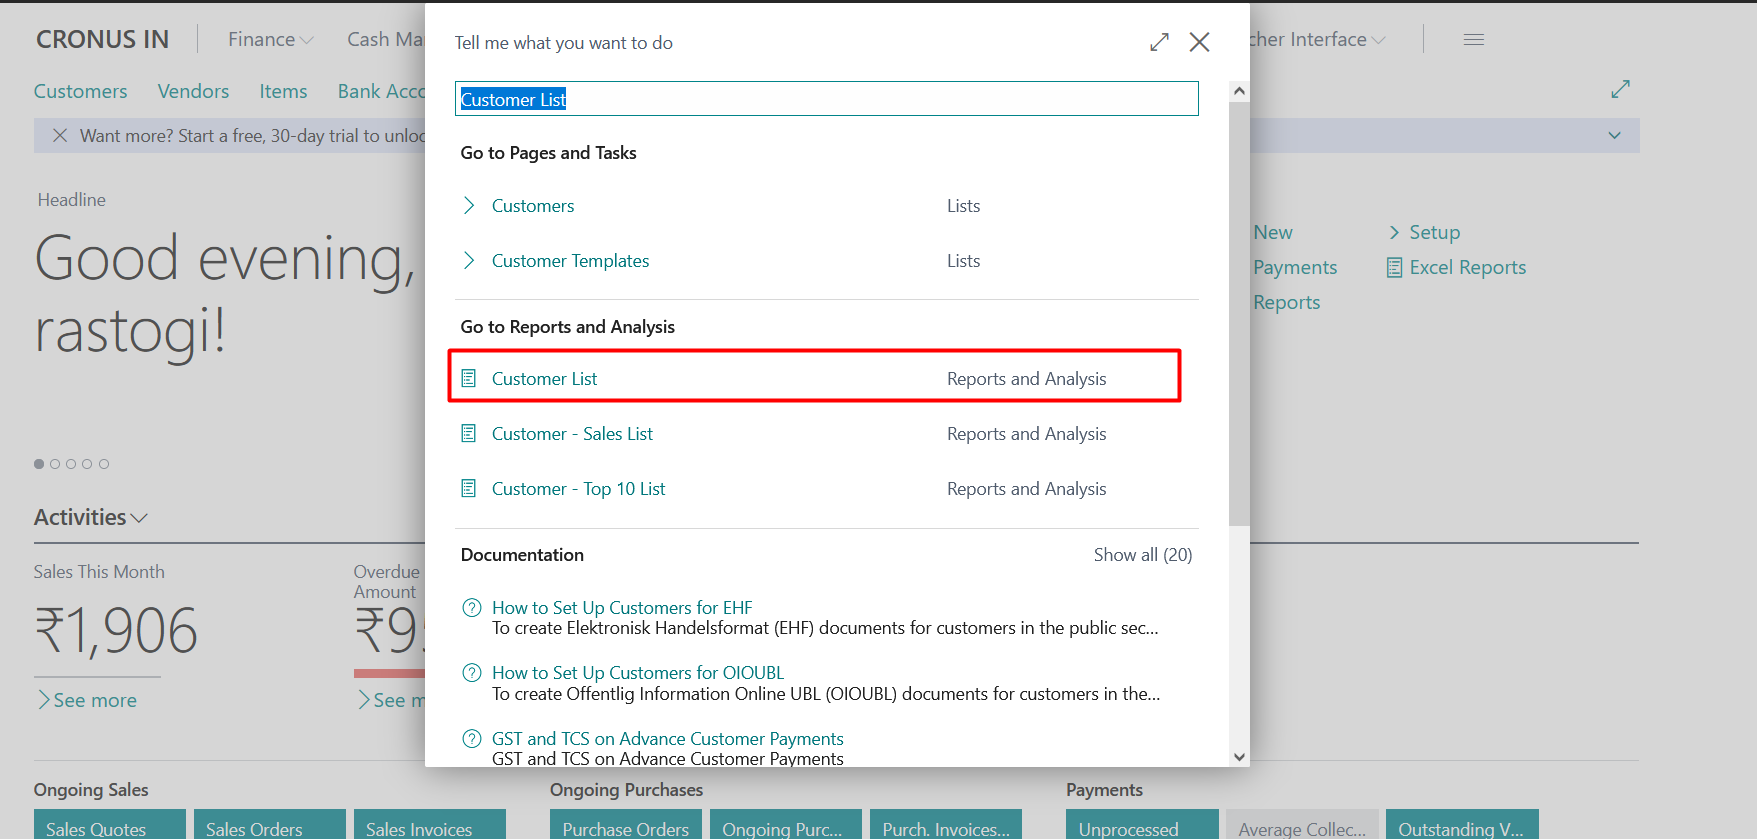
A new window will be pop out like below snippet.
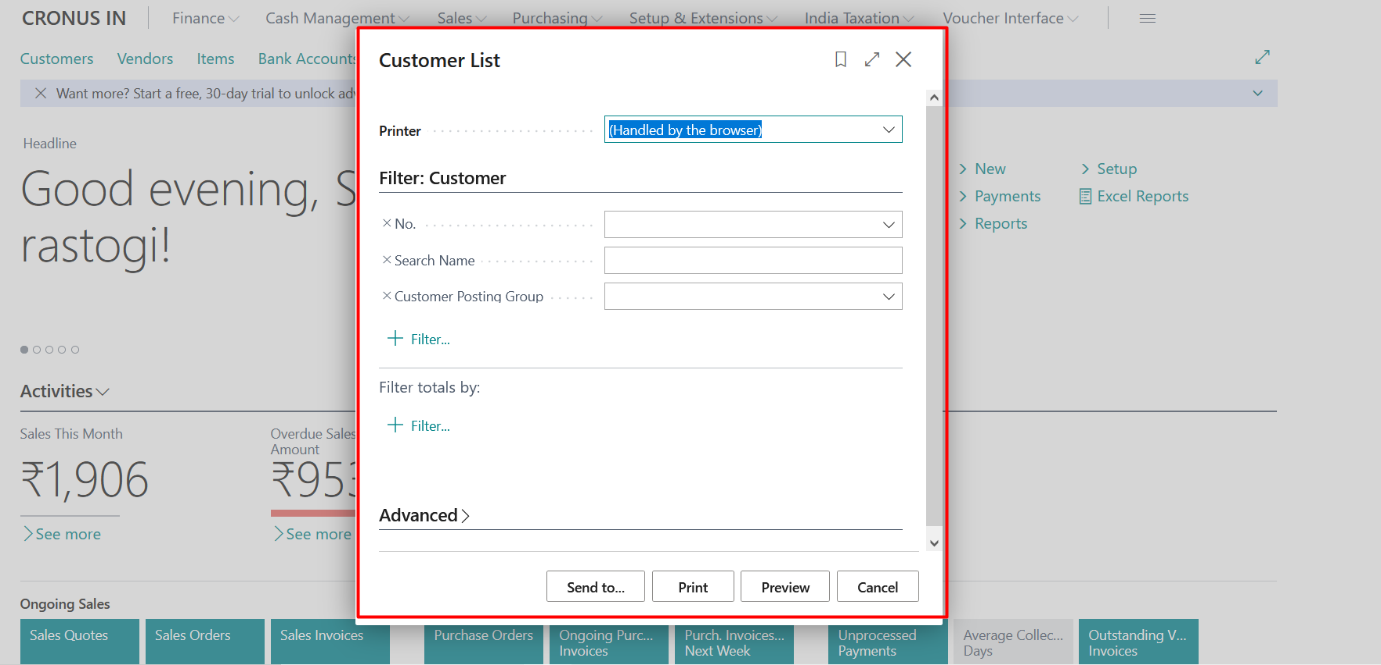
Select the required options and click on Preview to see the report preview.
Click on Preview to generate the report.
Budget Report
https://docs.microsoft.com/en-us/dynamics365/business-central/bi-how-analyze-actual-versus-budget:
Accounts payable
https://docs.microsoft.com/en-us/dynamics365/business-central/payables-report
This blog talks about Business Central State field customizations via...
Read MoreThis blog talks about Business Central Web Service APIs and...
Read MoreThis blog talks about Business Central Top 8 Unique Features...
Read More